Last updated on November 24, 2025
Providing your team with flexibility for unused time off doesn't have to be complicated. I'm going to walk you through setting up a brought forward policy in Vacation Tracker (also known as a rollover or carryover policy). This feature lets unused paid time off transfer into the next leave cycle, and it's available on all plans.
Watch the full walkthrough here:
What a Brought Forward Policy Actually Means
A brought forward policy (also called rollover or carryover) is when unused paid time off, vacation days, or any other leave type you choose gets transferred into the next year. Instead of losing those days, employees keep them in their balance. This is particularly useful for teams that want to reward employees who didn't use all their allocated time off.
The feature is available to all users regardless of which plan you're on, so you can implement it whether you're just starting with Vacation Tracker's Free Plan or using a paid tier.
Two Ways to Access Leave Policy Settings
You need to be logged into your Vacation Tracker account first. Then you have two paths to the same destination:
Option 1: Click on Leave Setup in your dashboard, then select Leave Policies.
Option 2: Go to a specific location, click View, then navigate to the Leave Policies tab.
Both routes take you to the same section where you can modify your leave types and enable brought forward settings.
Enabling the Brought Forward Feature
Once you're in the leave policies section, find the leave type you want to modify (in my example, I'm using Paid Time Off) and click the Edit button.
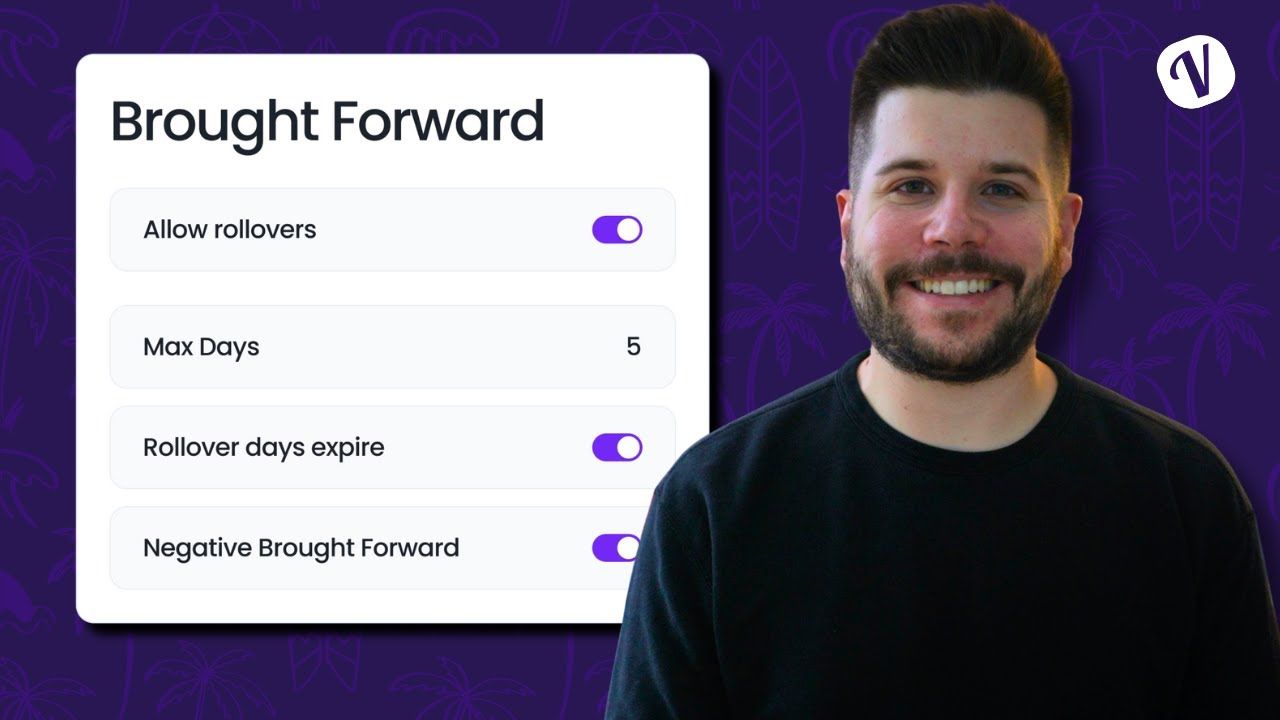
Scroll down until you see the Brought Forward Settings section. By default, this is disabled. Click the dropdown menu and you'll see two options:
Limited: This lets you cap the number of days or hours that can roll over. For example, if you set it to 5 days, employees can carry over a maximum of 5 unused days into the next year (even if they have 10 days remaining).
All: This is a blanket setting that allows all unused days to be carried over without any restrictions.
Additional Settings You Should Know About
If you choose the Limited option, you'll see a few more configuration choices:
Expiry Date: You can set brought forward days to expire by a certain date if you want. For instance, you might want carried-over days to expire by March 31st of the following year. You can also leave this set to 'No' by default if you don't want an expiry.
Apply to Future Leaves Only vs. Past and Future: This determines whether the policy affects only upcoming leave cycles or if it also applies retroactively to previous periods. Your choice here depends on your company's specific policy needs.
Negative Brought Forward: This is an interesting one. If an employee dips into their future balance (going negative on their current allocation), you can choose to have that negative balance roll over into the following year as well. This basically means they'd start the new year already in the red.
Once you're happy with your settings, click Update. The leave policy for that specific location will immediately reflect your changes.
How Employees See Their Brought Forward Balance
After you enable the policy, employees will see their brought forward days displayed separately when they check their leave balance. In my example, the user has 5 brought forward days shown as a distinct line item in their total balance.
When the system calculates their remaining balance, it clearly shows that those 5 unused days will roll over into the next period if they're not used. This transparency helps employees understand exactly what they have available.
Applying the Policy Across Multiple Leave Types and Locations
You'll need to repeat these steps for each leave type and each location where you want a brought forward policy active. If you have multiple offices or different leave types (vacation, sick days, personal days), you can configure different brought forward rules for each one.
This flexibility means you can have a generous rollover policy for vacation days but a more restrictive one for sick days, for example.
Need More Help?
If you have additional questions about setting up brought forward policies, you can read more detailed information in the Vacation Tracker Helpdesk. There are specific guides on setting up brought forward policies and adding expiry dates to carried-over days.
You can also reach out to the support team directly via chat or email if you need personalized assistance with your specific setup.
Learn how to manage time off without
Tracking Can Be
confusion, delays, or admin headaches. 

David Vero
David is a marketer who loves learning new things—preferably not during his PTO.