
Last updated on November 14, 2025
Welcome to Vacation Tracker!
Just signed up or getting started and looking to learn more? You’re in the right place.
We’ve put together this guide to help you get everything set up and walk you through the key features and settings to explore first.
If you need support along the way, our customer service team is always happy to help. You can reach us through live chat or email, and we also offer free setup calls to help you start off on the right foot and walk through any questions or comments you might have.
“The ease of implementation combined with the EXCELLENT customer service makes Vacation Tracker the ideal system for a small to medium-sized organization.” - Capterra Review 2021
If you prefer to learn at your own pace, we have a helpdesk full of how-to articles and a YouTube channel packed with tutorials and walkthroughs, ideal for visual learners.
But if you’re looking for a quick, guided start, this is the best place to begin exploring the PTO tracker and setup process.
Ready?
Getting Started in 30 Minutes or Less
Customization is always top of mind at Vacation Tracker. But don’t worry, flexible doesn’t mean complicated. Most teams are fully set up in under an hour, no handholding required (though we’re happy to help if needed). Below we’ll outline what your first steps will look like to guide you through the setup.
Step 1: Start a Free Trial
With a 14-day trial that requires no commitment, getting started with Vacation Tracker couldn’t be easier. Just sign up, pick your integration and plan, and you’re all set.
Know exactly who's off and when—no spreadsheets, no surprises.![]()
out of time off ![]() tracking.
tracking.![]() No credit card required.
No credit card required.
Step 2: Import Users
You can import users at any point during the set up, but we recommend starting off with this step. Adding your team early on makes the rest of the setup, from creating Locations and Departments to assigning policies, go more smoothly.
You’ll be able to import users manually or through integrations. You choose what works best for you!
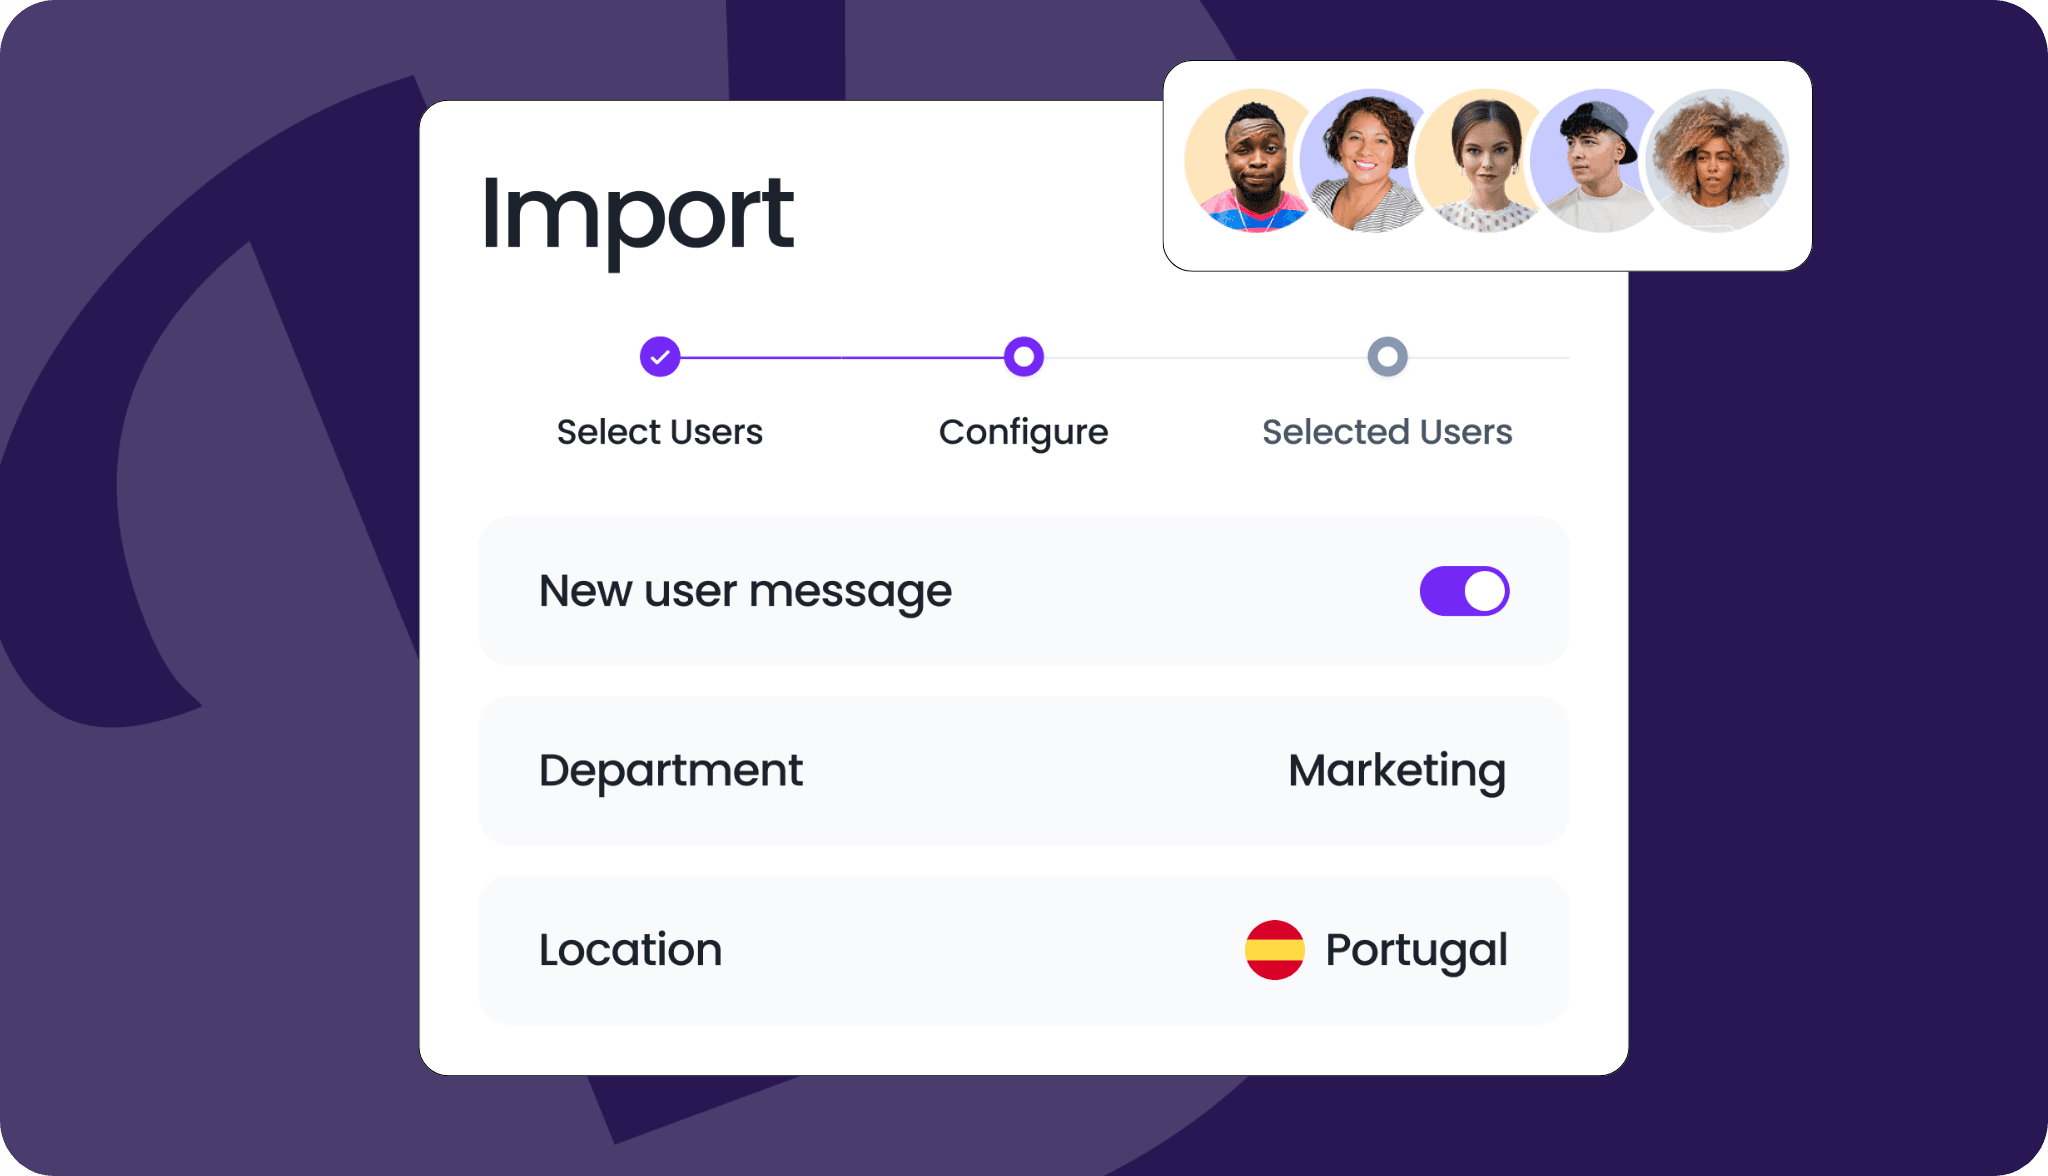
Resource: Import User Guide
Step 3: Create a Leave Type
Your account will come with a few basic leave types already input for you, like PTO, Sick Days, and Remote Work. These are just some examples of different types of leave.
You can customize this section to your heart's desire to match your organization’s set up. Some companies might only need a few leave types, while others might need to add in everything from unpaid time off to mental health days and pawternity leave.
The freedom is yours. Name your leave type, select a color code for it, and select if you’d like for users to appear as free or busy when out on this type of leave.
Resource: Configuring Leave Types
Step 4: Create a Location
If your team works across different cities, states, or countries, this step will help you keep everything organized.
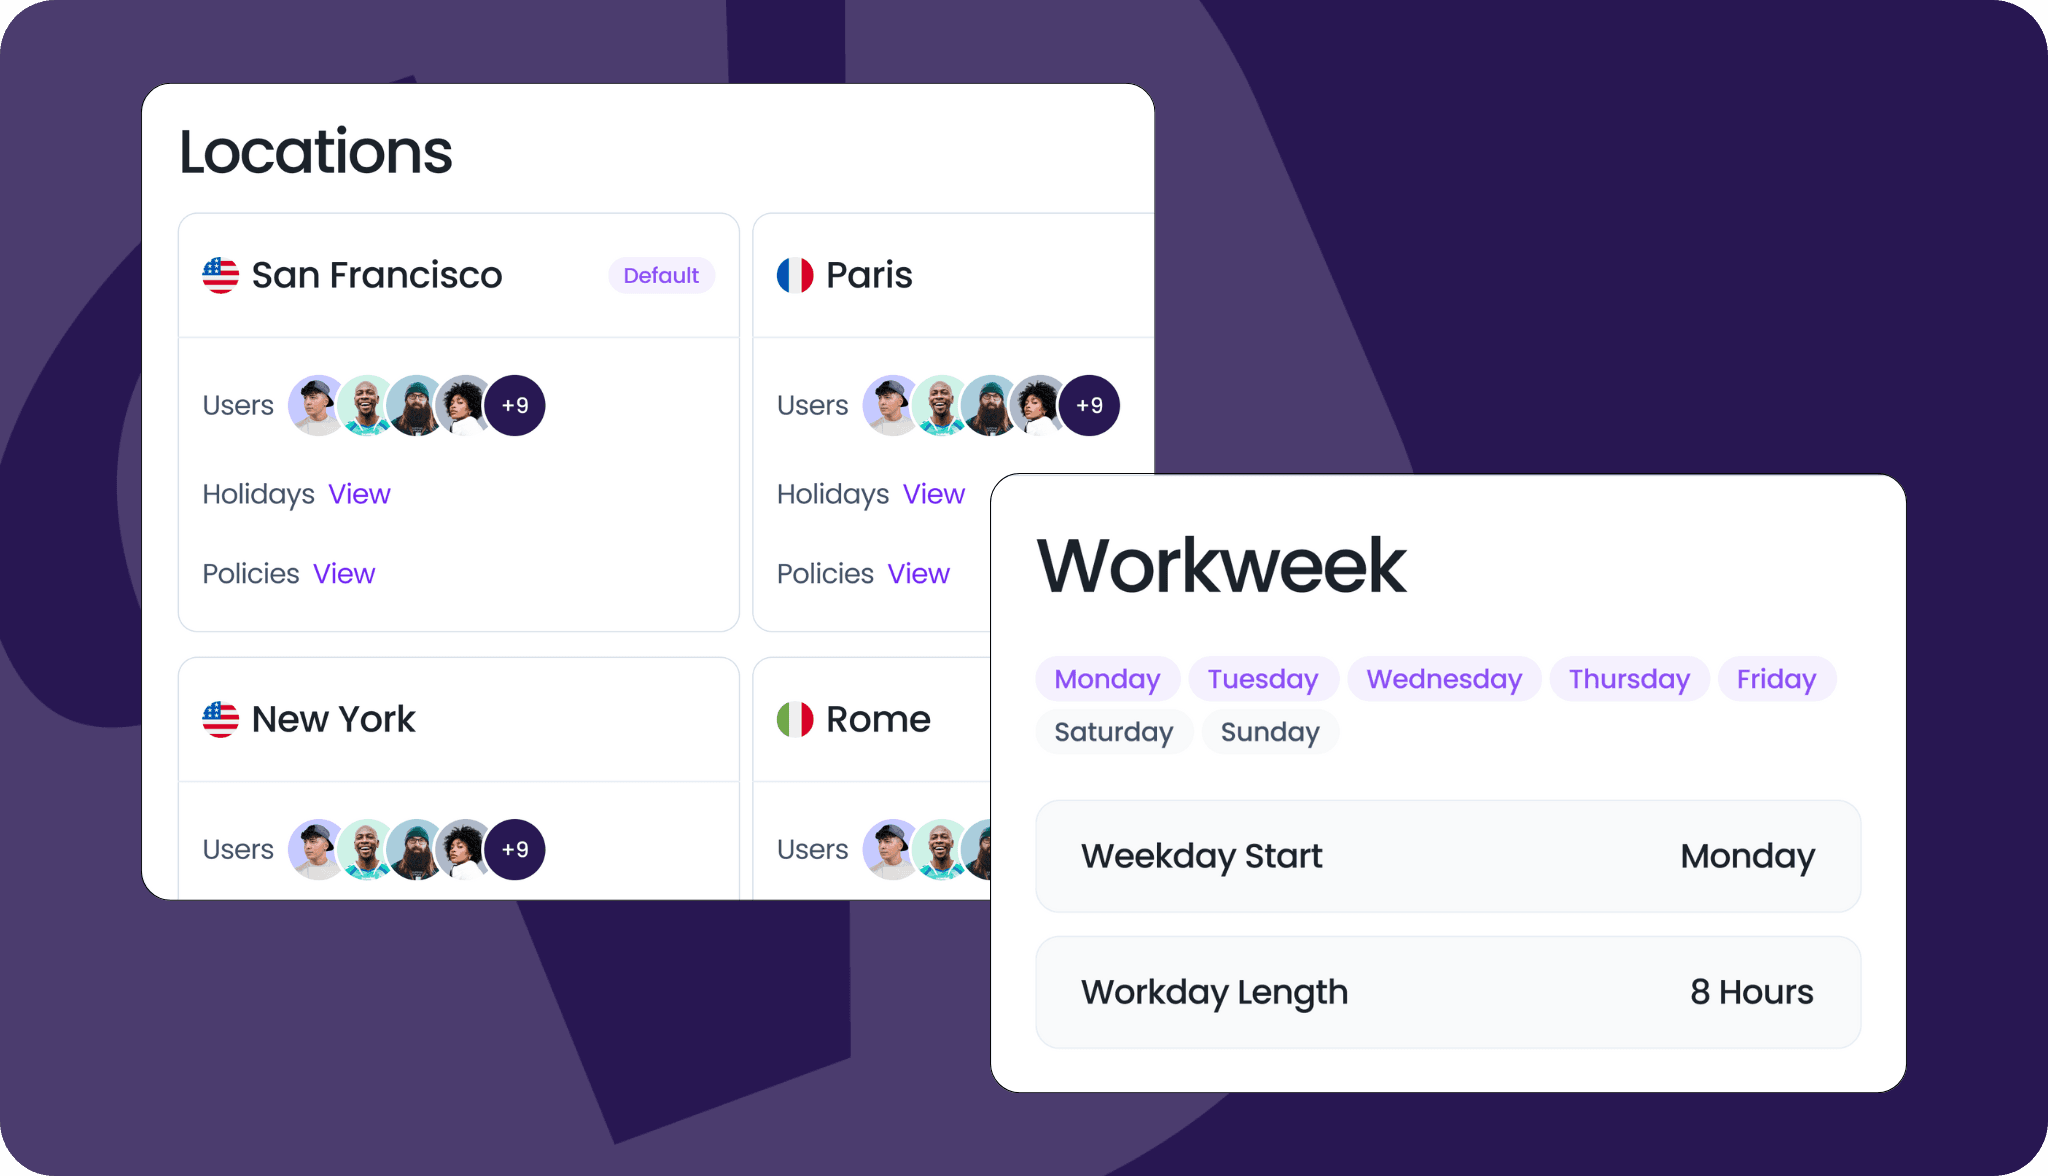
Create a Location for each region where you have employees and assign users accordingly. You’ll be able to customize the workweek and working hours per location, as well as when the leave quota resets.
Curious as to how Vacation Tracker can be a game-changer for global teams? Discover how Crossref optimized its leave tracking across 12 locations with our tool. Read the case study.
Resource: Create a Location
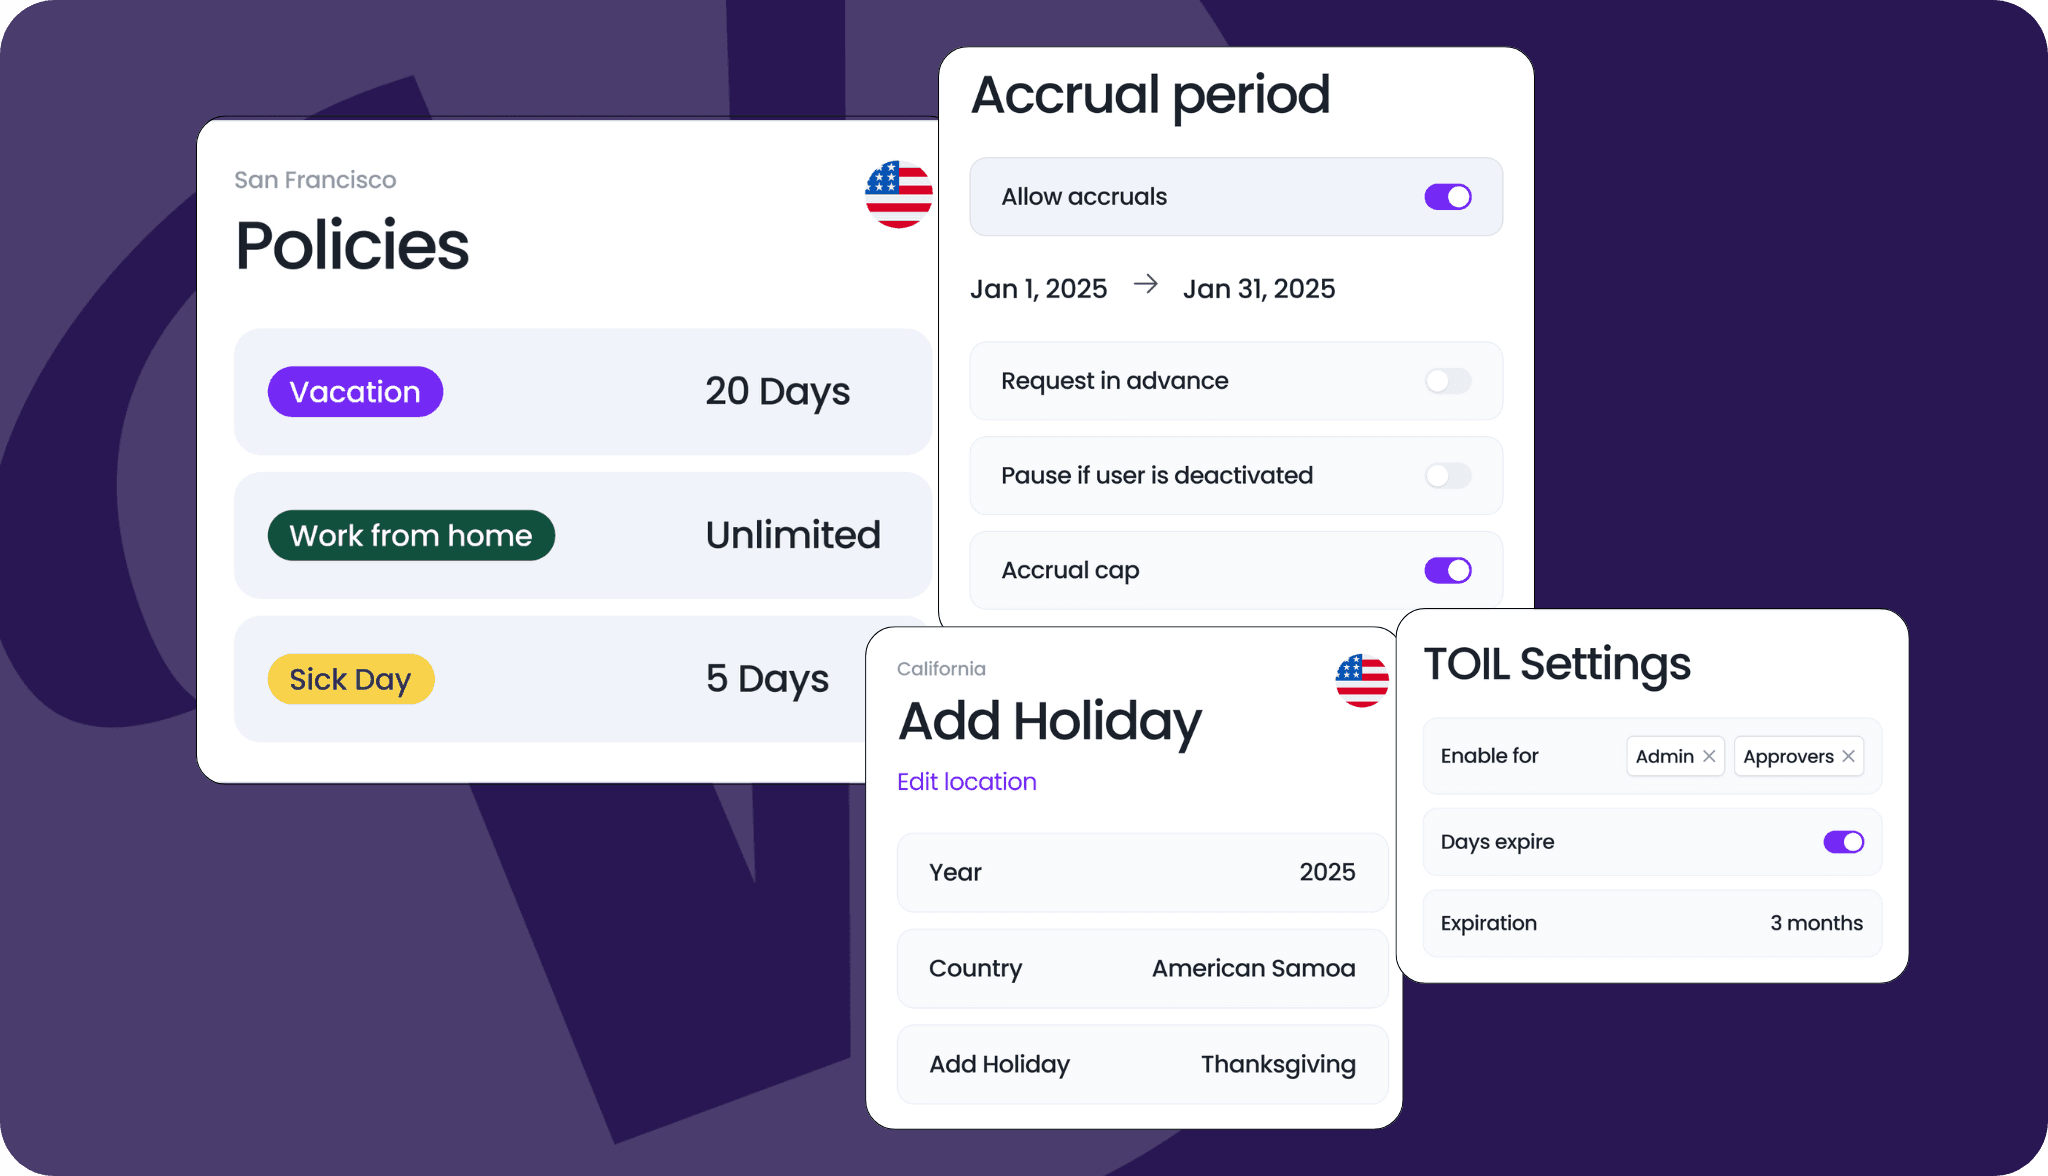
Step 5: Customize your Leave Policies
Now is the time to get granular with it and fine-tune your setup to match your company’s specific rules.
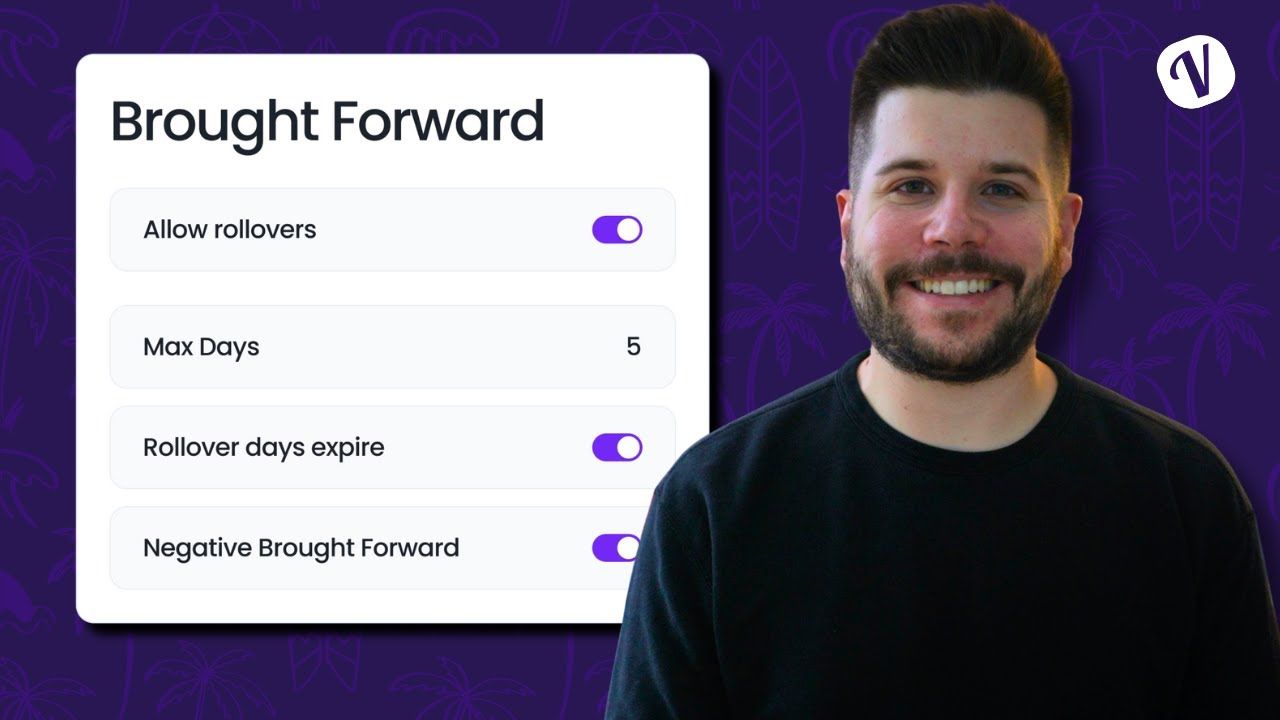
Leave policies are assigned to each location, and this is where you’ll define how much leave users get, how approvals work, whether a reason is required, and more. You can set quotas, choose accrual settings, decide if and how unused leave is brought forward, set minimum leave durations, and enable Time Off in Lieu (TOIL).
Not sure where to start? Use our Leave Laws resource to help make sure your policies are compliant with regional laws.
Resource: Configure Leave Policies
Step 6: Add Holidays
Holidays are a core component of your company’s PTO calendar. Admins can quickly import holidays for each of their locations automatically in Vacation Tracker and select those that their business observes. You can also add custom holidays manually if needed, whether it’s a company-wide day off or a regional celebration unique to a specific team or office.
Now holidays will appear in your team’s calendar view, dashboard, and notifications, so everyone knows which holidays are coming up, including those in other countries or regions.
Resource: Set Up Holidays
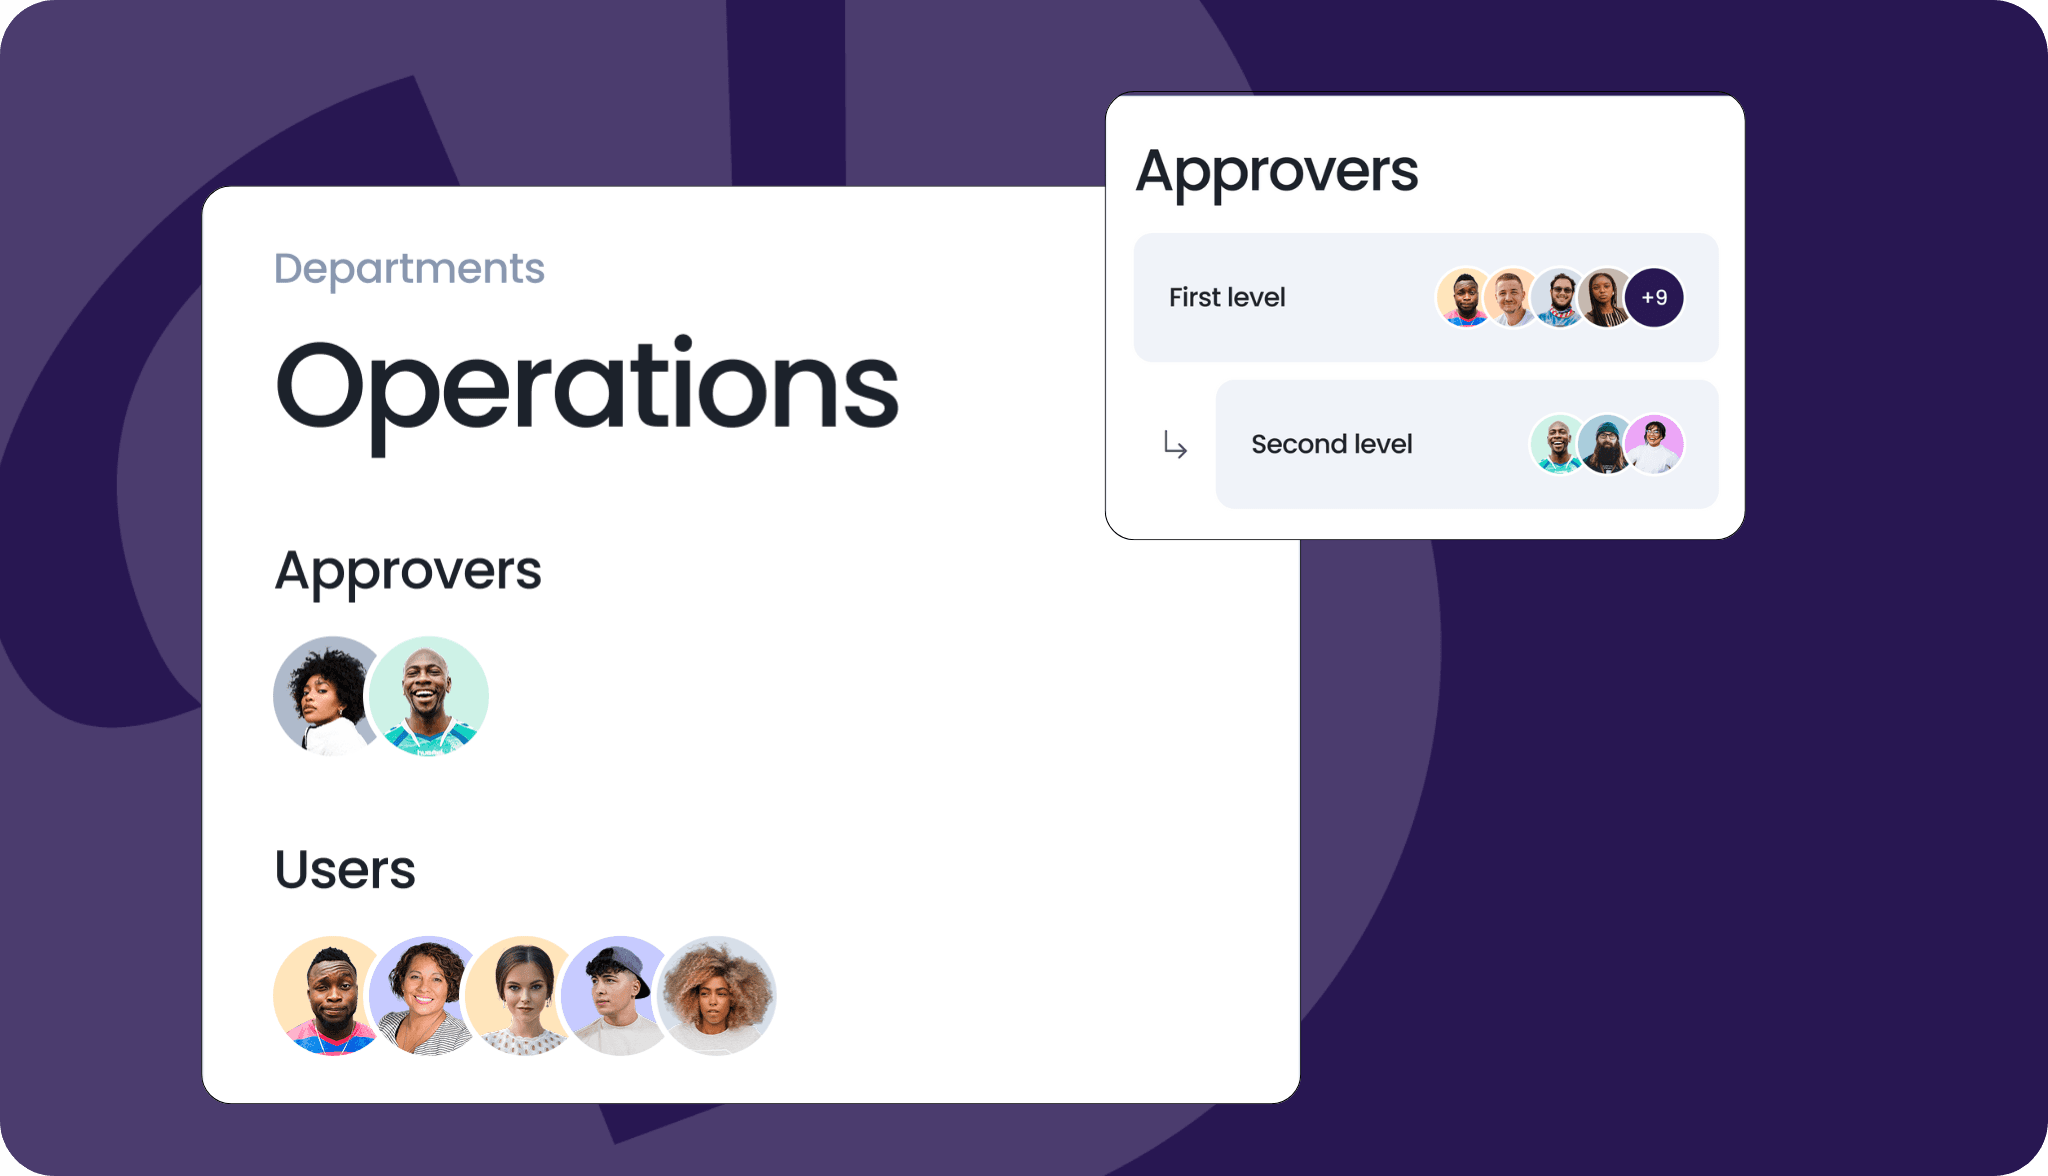
Step 7: Add Departments
Departments help you mirror your org chart in Vacation Tracker. You’ll want to replicate your company’s structure directly in our tool by assigning users to different departments and subdepartments.
Once your departments are set up, you can group users more efficiently, assign approvers, and filter views based on teams.
Departments also drive your leave approval process. Each department can have designated approvers, making sure that leaves are managed by the right people, at the right level.
Resource: Create a Department
Step 8: Create Notifications
Notifications help your team stay in the loop and bring PTO information directly into their workspace.
As an admin, you can set up automated daily or weekly notifications to remind users of upcoming leaves so everyone knows who’s off and when. These notifications can be grouped by department or location and sent to a specific channel or email. Plus, you choose what day and time you’d like to receive these updates. 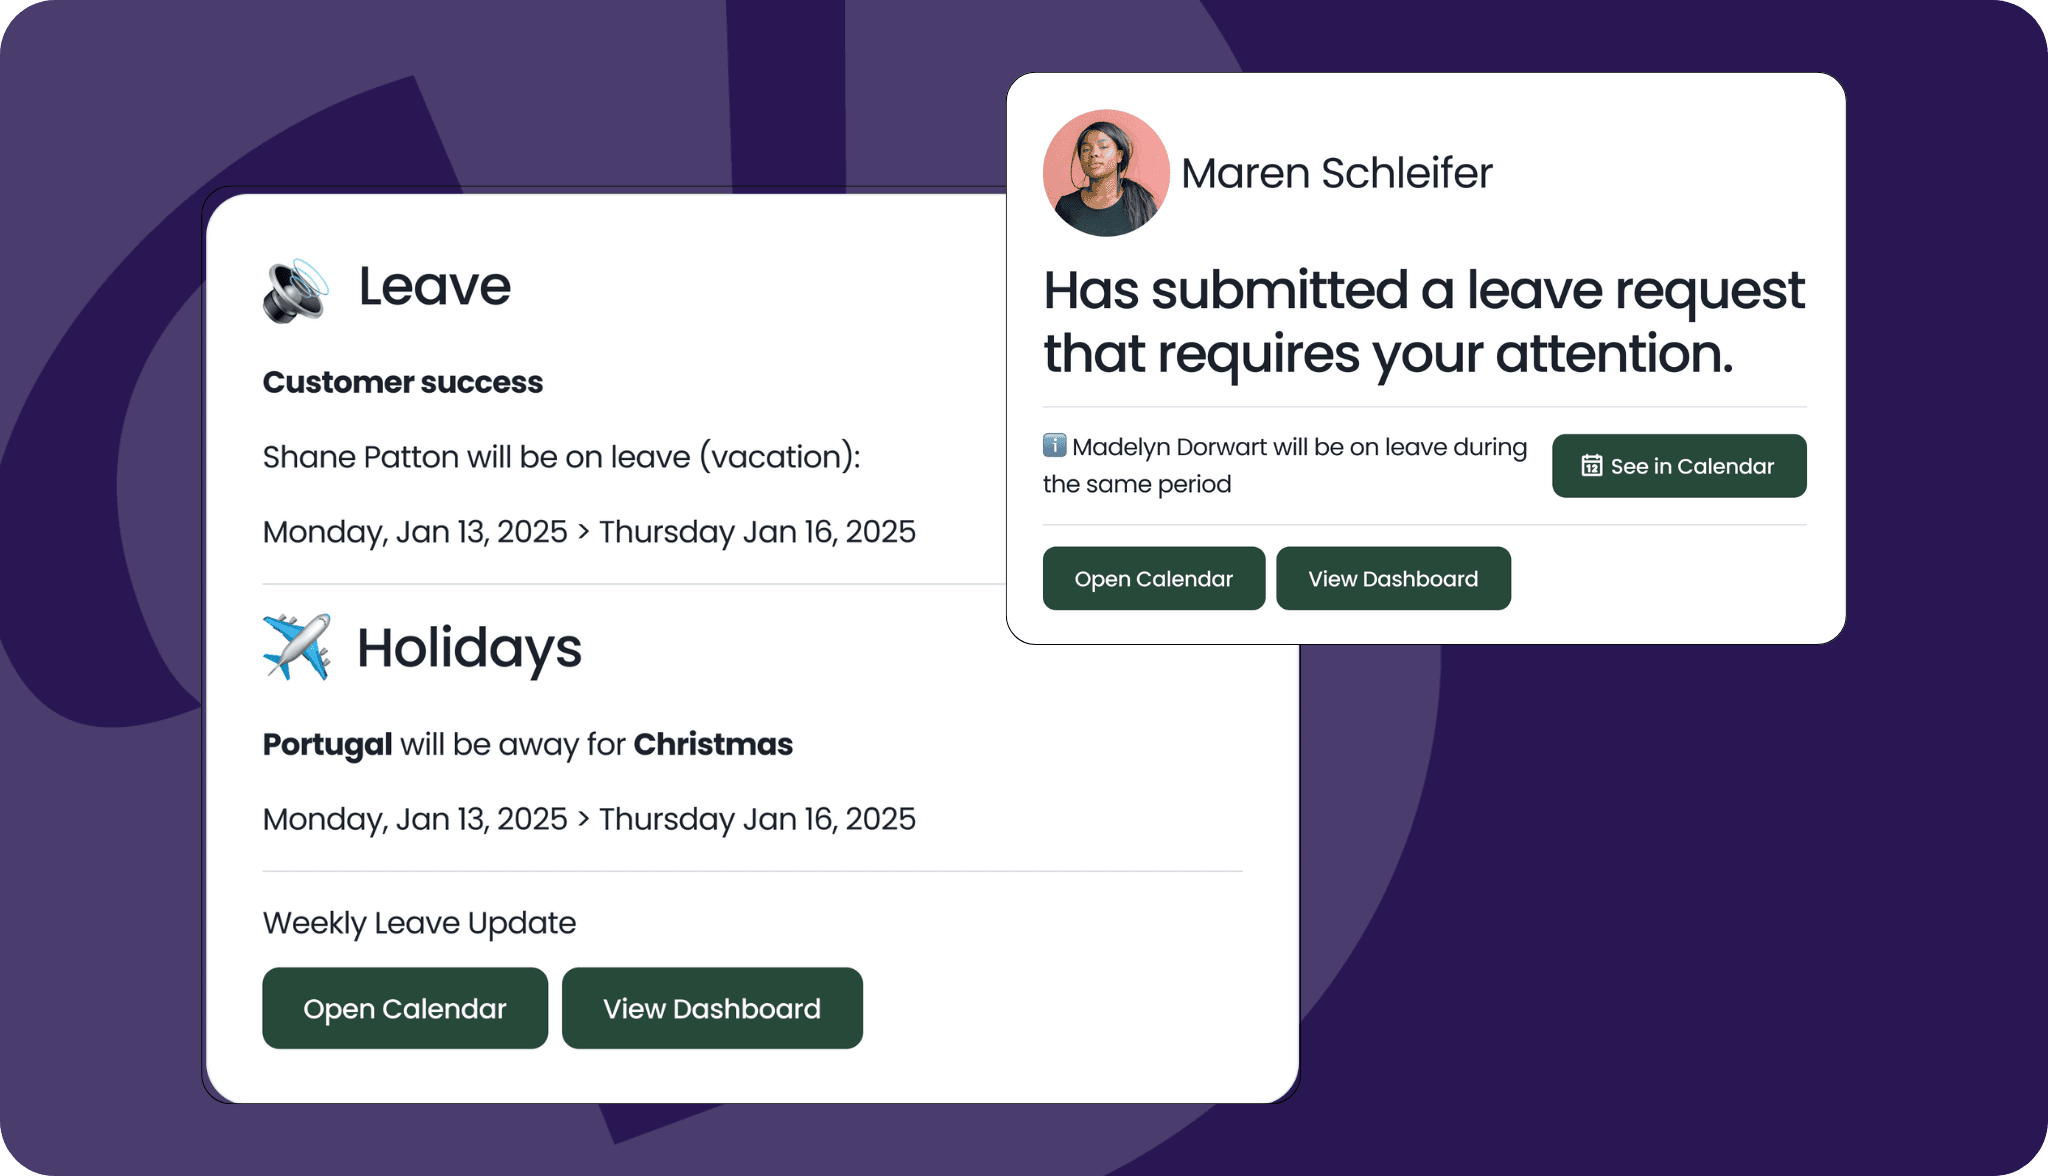
Resource: Setting Up Notifications
Step 9: Set up Reports
Reports provide management and HR with valuable insights into leave trends for optimal workforce planning.
Vacation Tracker has several different report types to help you analyze leave requests, leave balances, and more.
Each report is highly customizable. You can filter by a series of details including date, leave type, location, or department to get exactly the data you need. Once you’re happy with your report, you can export it and share it with your team. Or if you want to be totally hands-off, you can schedule the report to be sent out to the email list of your choosing, on the day and time you specify.
Resource: Scheduling Reports
Step 10: Explore Add-Ons
Once your setup is done, you can unlock even more features with Add-Ons.
These are extra functionalities designed to make Vacation Tracker more powerful without cluttering your dashboard or overwhelming your team. From Seniority Entitlements to Probation Periods and Maximum Users Away, you decide what you need, and when.
All Add-Ons are completely free during your trial so you can test everything out before making a decision. After that, they’re available for just $0.50 per user, per month.
💡 Optional Step: Use our AI Assistant
As described above, all our set up can be done manually but if you prefer, you can configure your account with the help of our AI Assistant. Just chat with our robot colleague and it’ll guide you through the setup by asking a few questions. Based on your replies, it will help configure your account, offering you another quick and easy way to get things up and running.
Discovering Integrations
One of the simplest ways to make Vacation Tracker feel like a natural part of your workflow is by connecting it to the tools your team already uses. Whether your team uses Slack, Microsoft Teams, or Google Calendar, integrations help bring PTO tracking straight to your workspace, no extra tabs or accounts needed.
Here’s a breakdown of what each integration can do and why it might be worth turning on during your setup.
Calendar Sync
Vacation Tracker centralizes all PTO data in one place, keeping it accurate and always up to date. But that information is most useful when it’s accessible in tools you already use every day. Our calendar integrations make that easy.
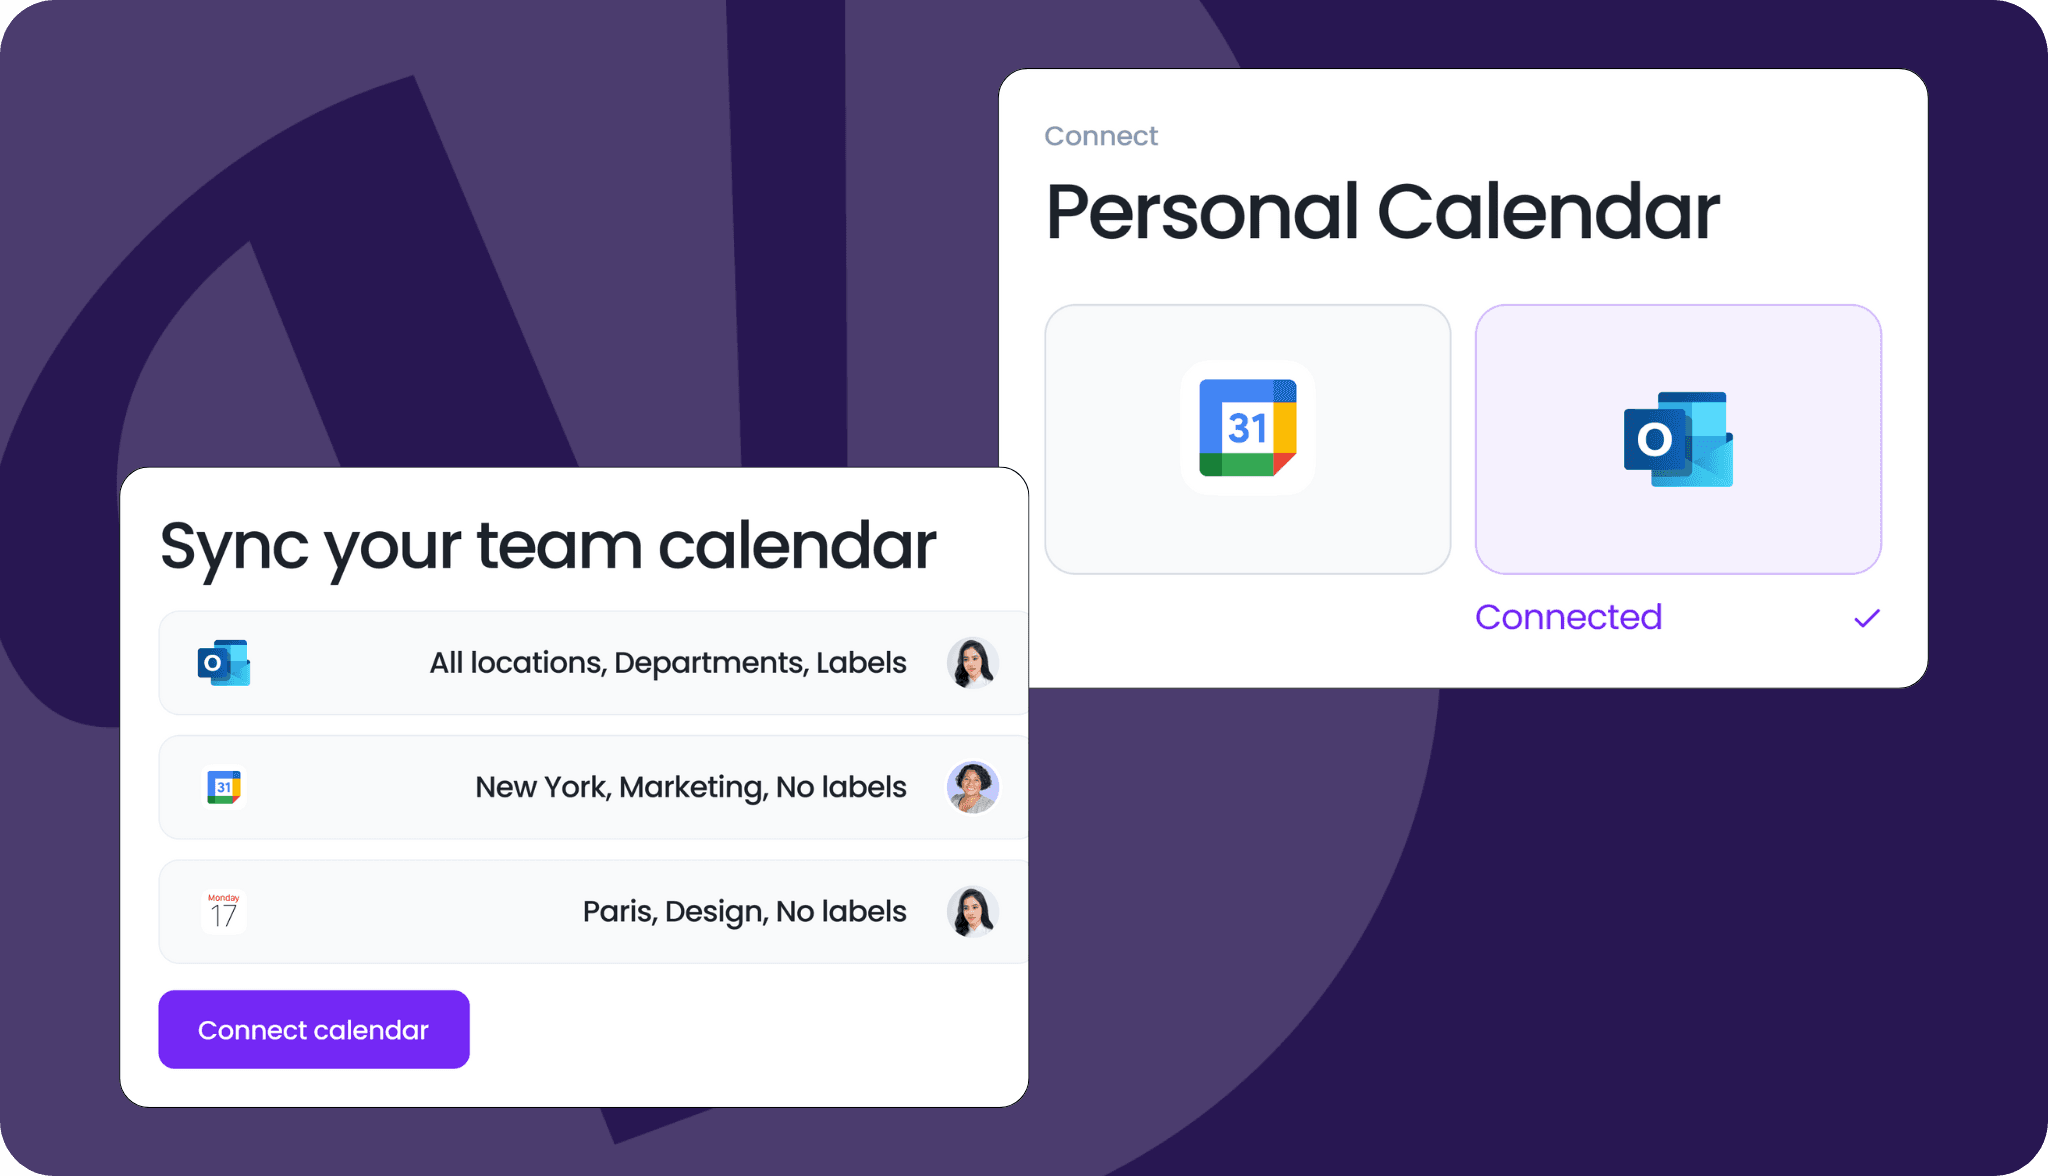
Shared calendars show everyone’s approved leaves in a shared team calendar and are great for team-wide visibility.
Personal calendar syncs are set up by individual users. Once connected, approved leave will automatically show up in their personal calendar like Google or Outlook. It’s a simple way for users to keep track of their time off directly from their calendar.
Slack
Vacation Tracker integrates with Slack so that users can book time off, check their leave balance, and get notified about upcoming leaves without ever leaving their workspace.
Just type /vacation in any channel or direct message to open up the Vacation Tracker menu.
From there, you can request leave or TOIL, view your remaining days off, see who’s out today, access your dashboard, and more.
Admins can also enable daily or weekly leave summaries in specific Slack channels, helping the whole team stay in the loop. You’ll get visibility, reminders, and real-time updates without needing to switch tabs.
“The biggest selling point is that Vacation Tracker integrates into Slack. Everything before was emails or spreadsheets. You couldn’t just contact anyone regarding leave, you had to contact the right person. Now, all you have to do is type /vacation,” - Kim Chief Operations Officer at Orbital Mechanics.
Microsoft Teams
Vacation Tracker works directly inside Microsoft Teams, so users can easily request leave, check their balances, and stay on top of upcoming absences.
The My Profile tab shows your personal leave details, including past and upcoming time off, remaining days, and request history. The Overview tab displays your team’s upcoming absences and holidays, helping everyone stay in the loop and the Calendar tab is great to quickly visualize who’s off at a glance.
Managers and admins can also enable daily or weekly updates in Teams channels to keep everyone informed, no extra reminders needed.
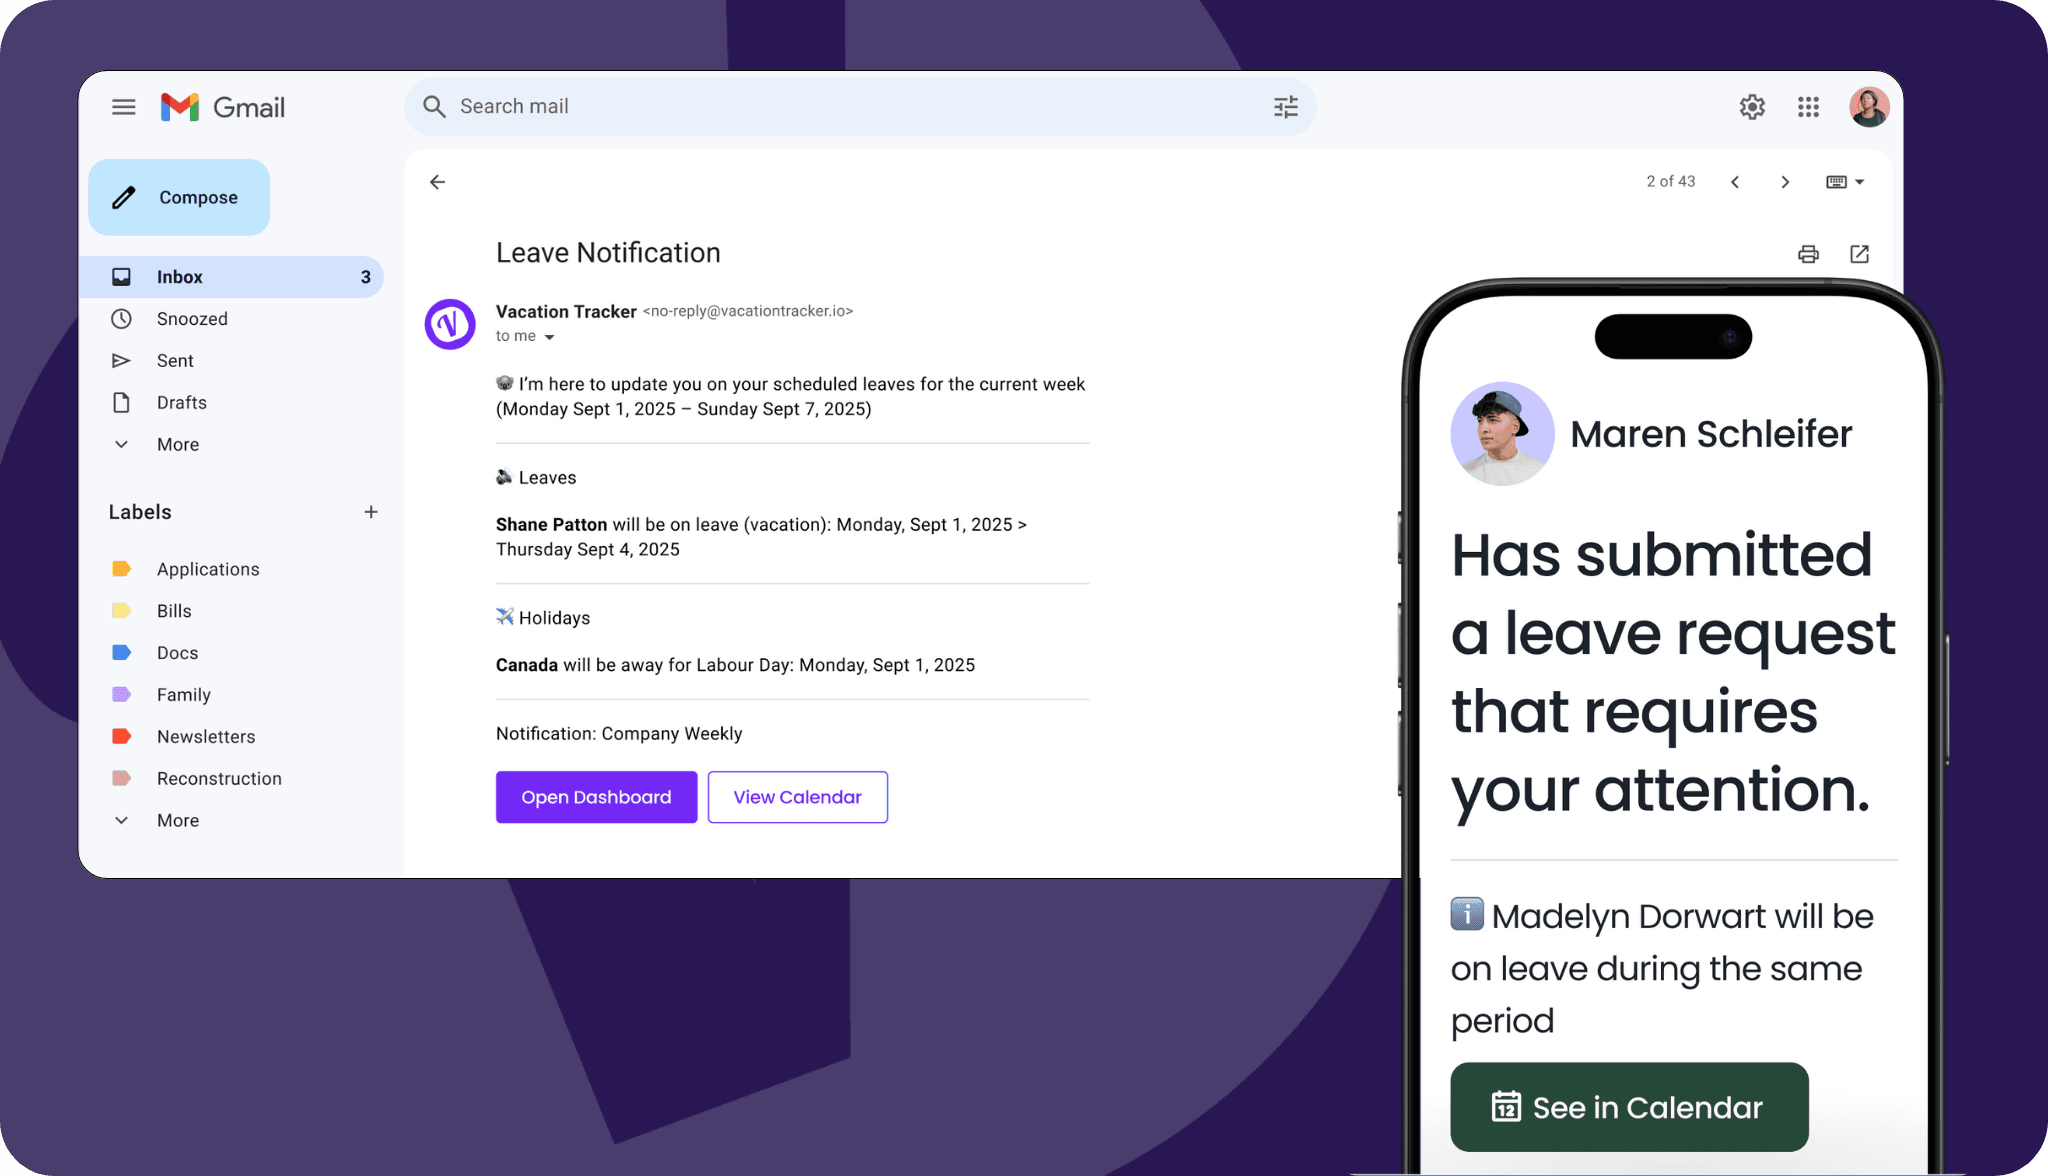
Google Workspace
If your team uses Google Workspace, users can sign in to Vacation Tracker with their Google account, without needing to create new accounts and passwords. Admins can import users directly from their Google Directory to make onboarding even faster.
Approved leaves can be synced to Google Calendar, so time off shows up right alongside meetings, deadlines, and events, either in a shared calendar for complete plan users or personal calendar.
And you’ll also get updates on leave requests, upcoming absences, and holidays straight in your inbox.
Understanding Different Roles
In Vacation Tracker, each user is assigned a role that determines what they can see and do in the platform. There are three roles available: Admin, Approver, and User.
Each role has different permissions depending on what they’re responsible for in your team. Here’s a quick breakdown of how they work.
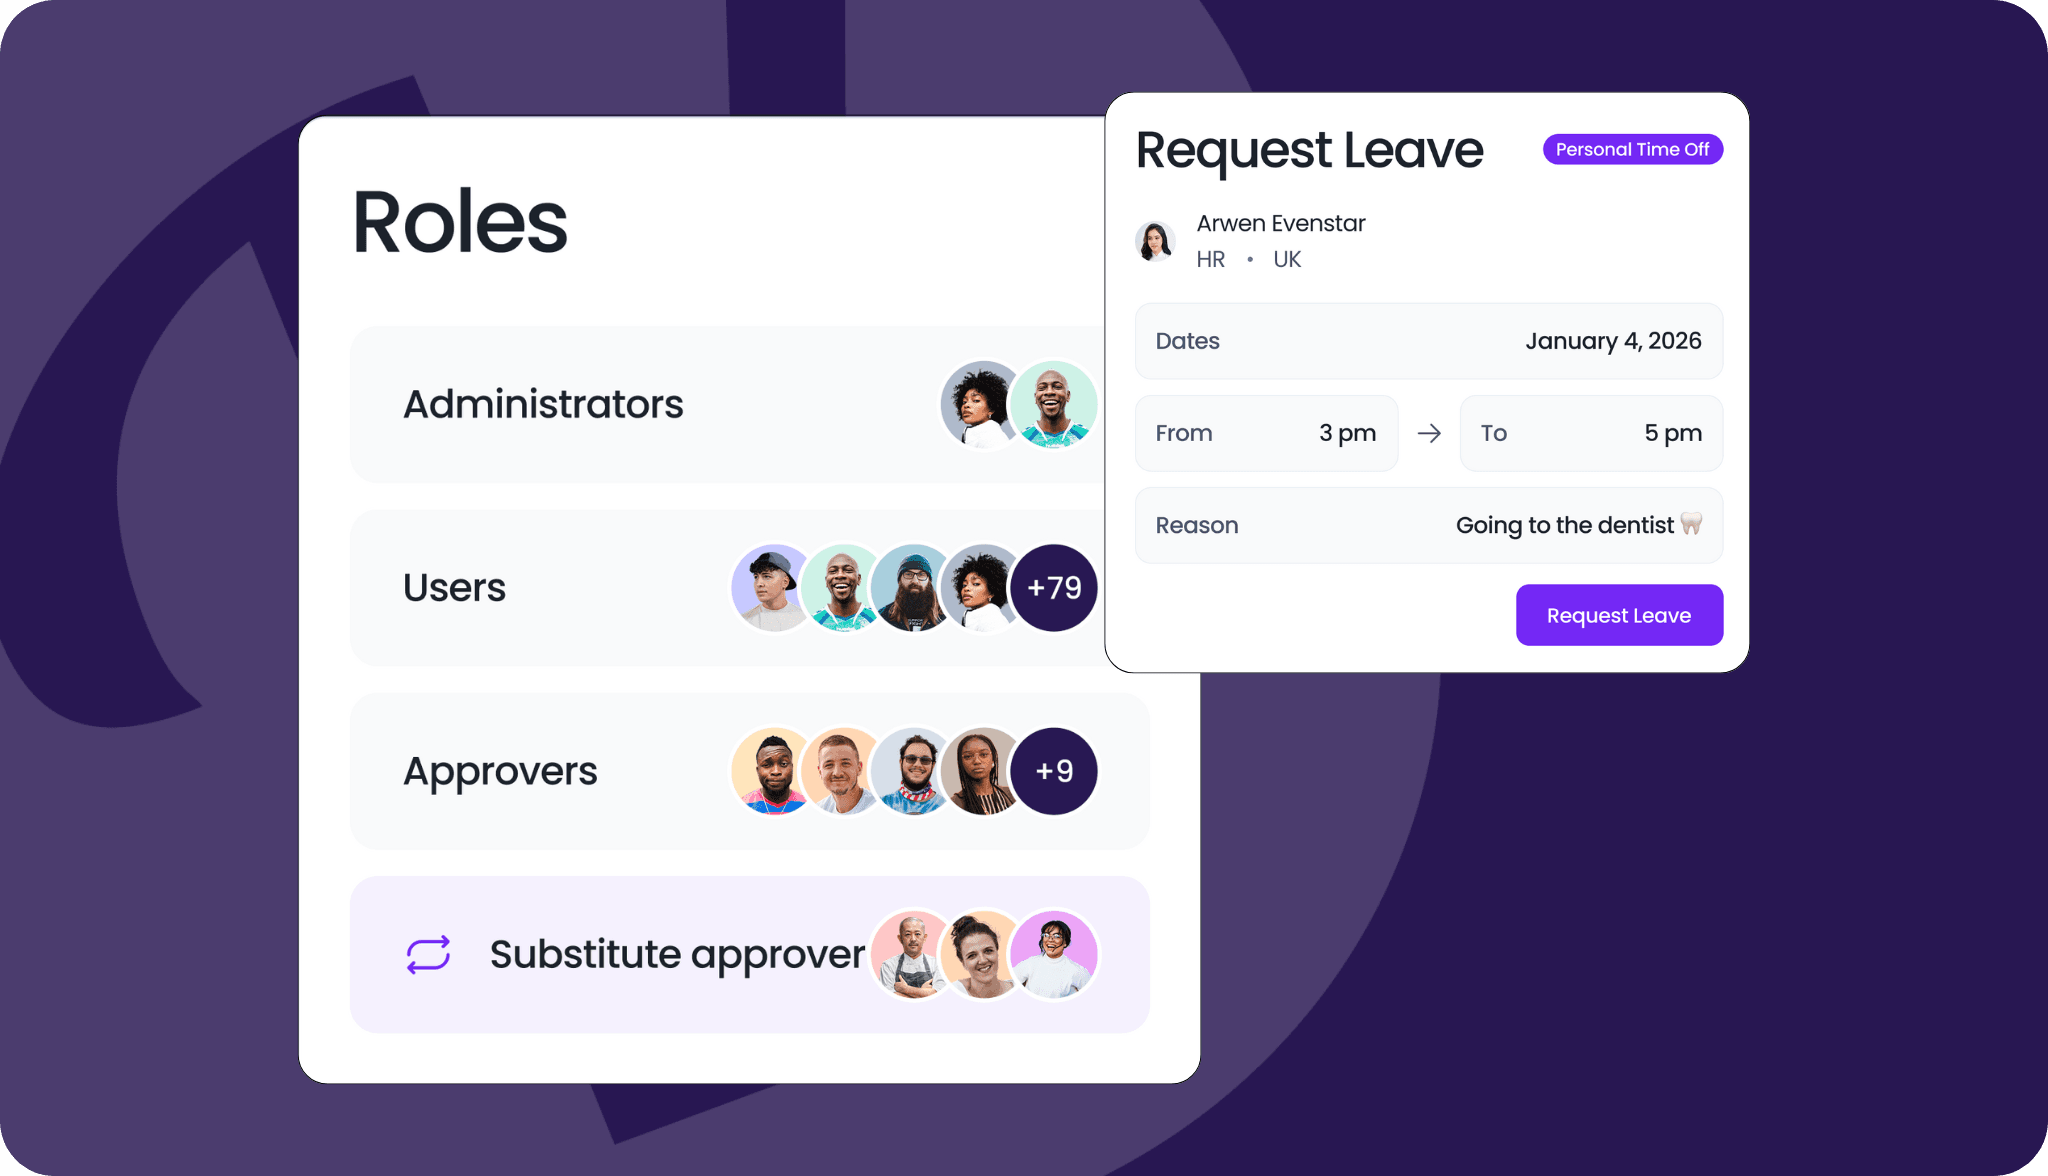
Admin: Admins have full access to all settings, user data, leave information, and account controls in Vacation Tracker. They can manage users, assign roles, customize settings, and view everyone’s leave history across the organization.
Approver: Approvers can review, approve, or deny leave requests for their assigned departments. They can also view their team’s leave balances and history.
User: Users can request leave, view their leave balance and history, and see upcoming absences through the dashboard or calendar.
Exploring the Platform
Now that you’re all set up, explored optimal integrations, imported your team, and assigned them the right roles, it’s time to tour the software and discover some key features.
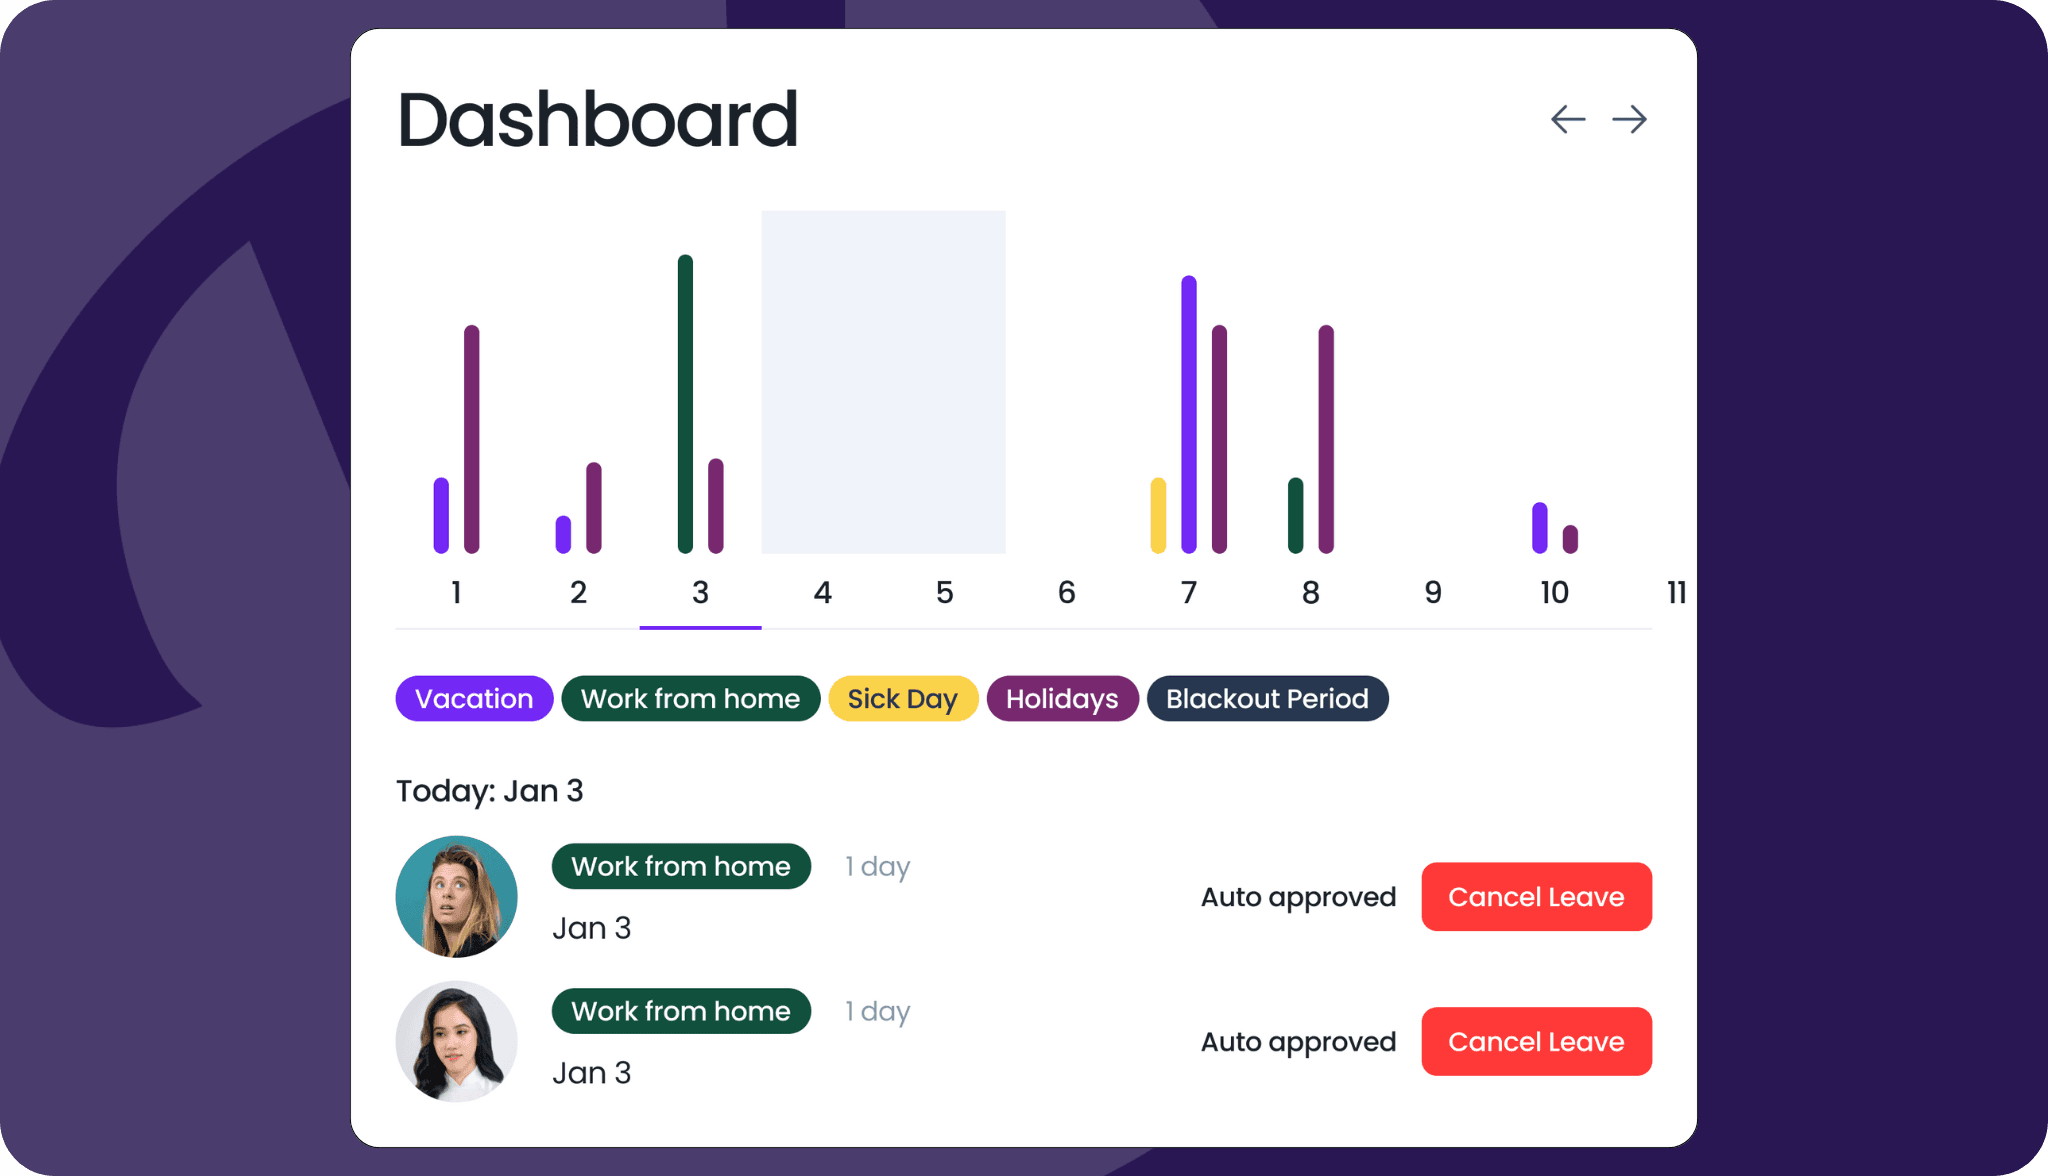
Dashboard
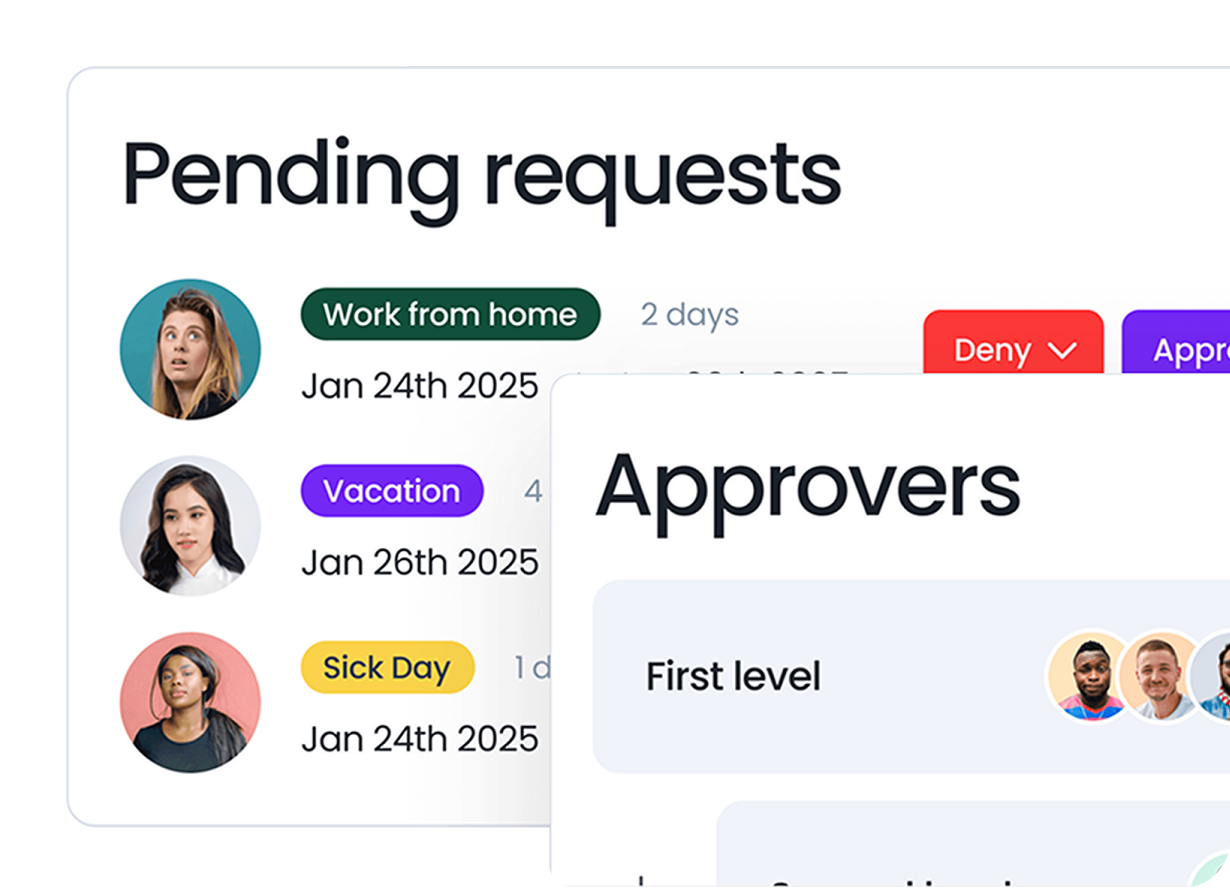
The dashboard gives you a quick overview of past, present, and upcoming leaves and holidays. What you see here depends on your role, Admins and Approvers will also be able to see Pending Requests, while Users see only Approved Leaves. You can filter by department, location, or label to get a clear view of team availability.
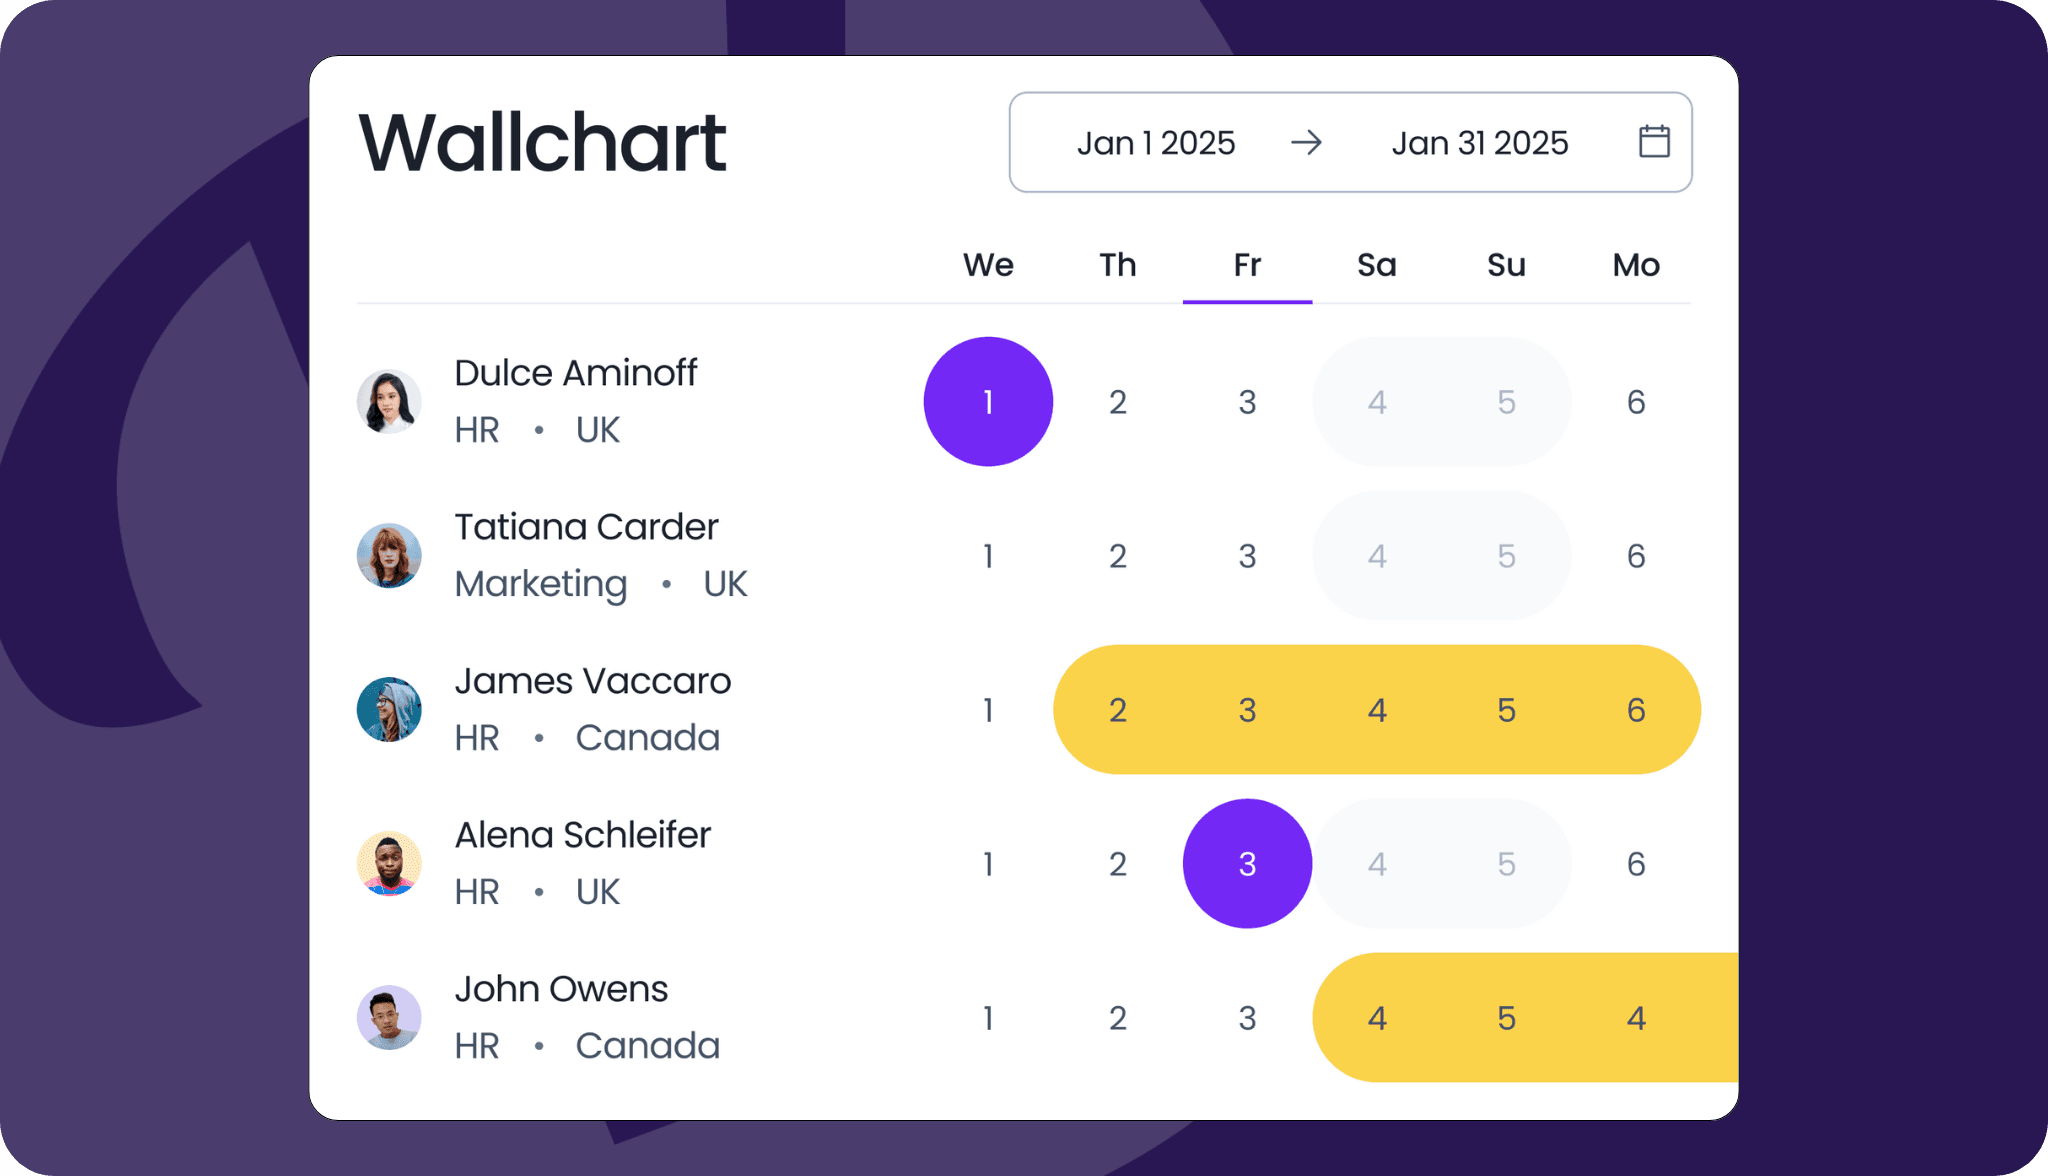
Wallchart
The Wallchart is a centralized view of who’s off and when, designed to make planning easier for Admins and Approvers. It’s color-coded by leave type and shows all approved and pending leaves in one place. You can filter by department, location, or user to get the exact view you need, helping your team avoid overlapping time off or short staffing.
Calendar View
This view lets you see all scheduled time off in a traditional calendar layout. It’s great for visualizing upcoming absences across the team. Plus, filters make it easy to access the information you need without all the noise. 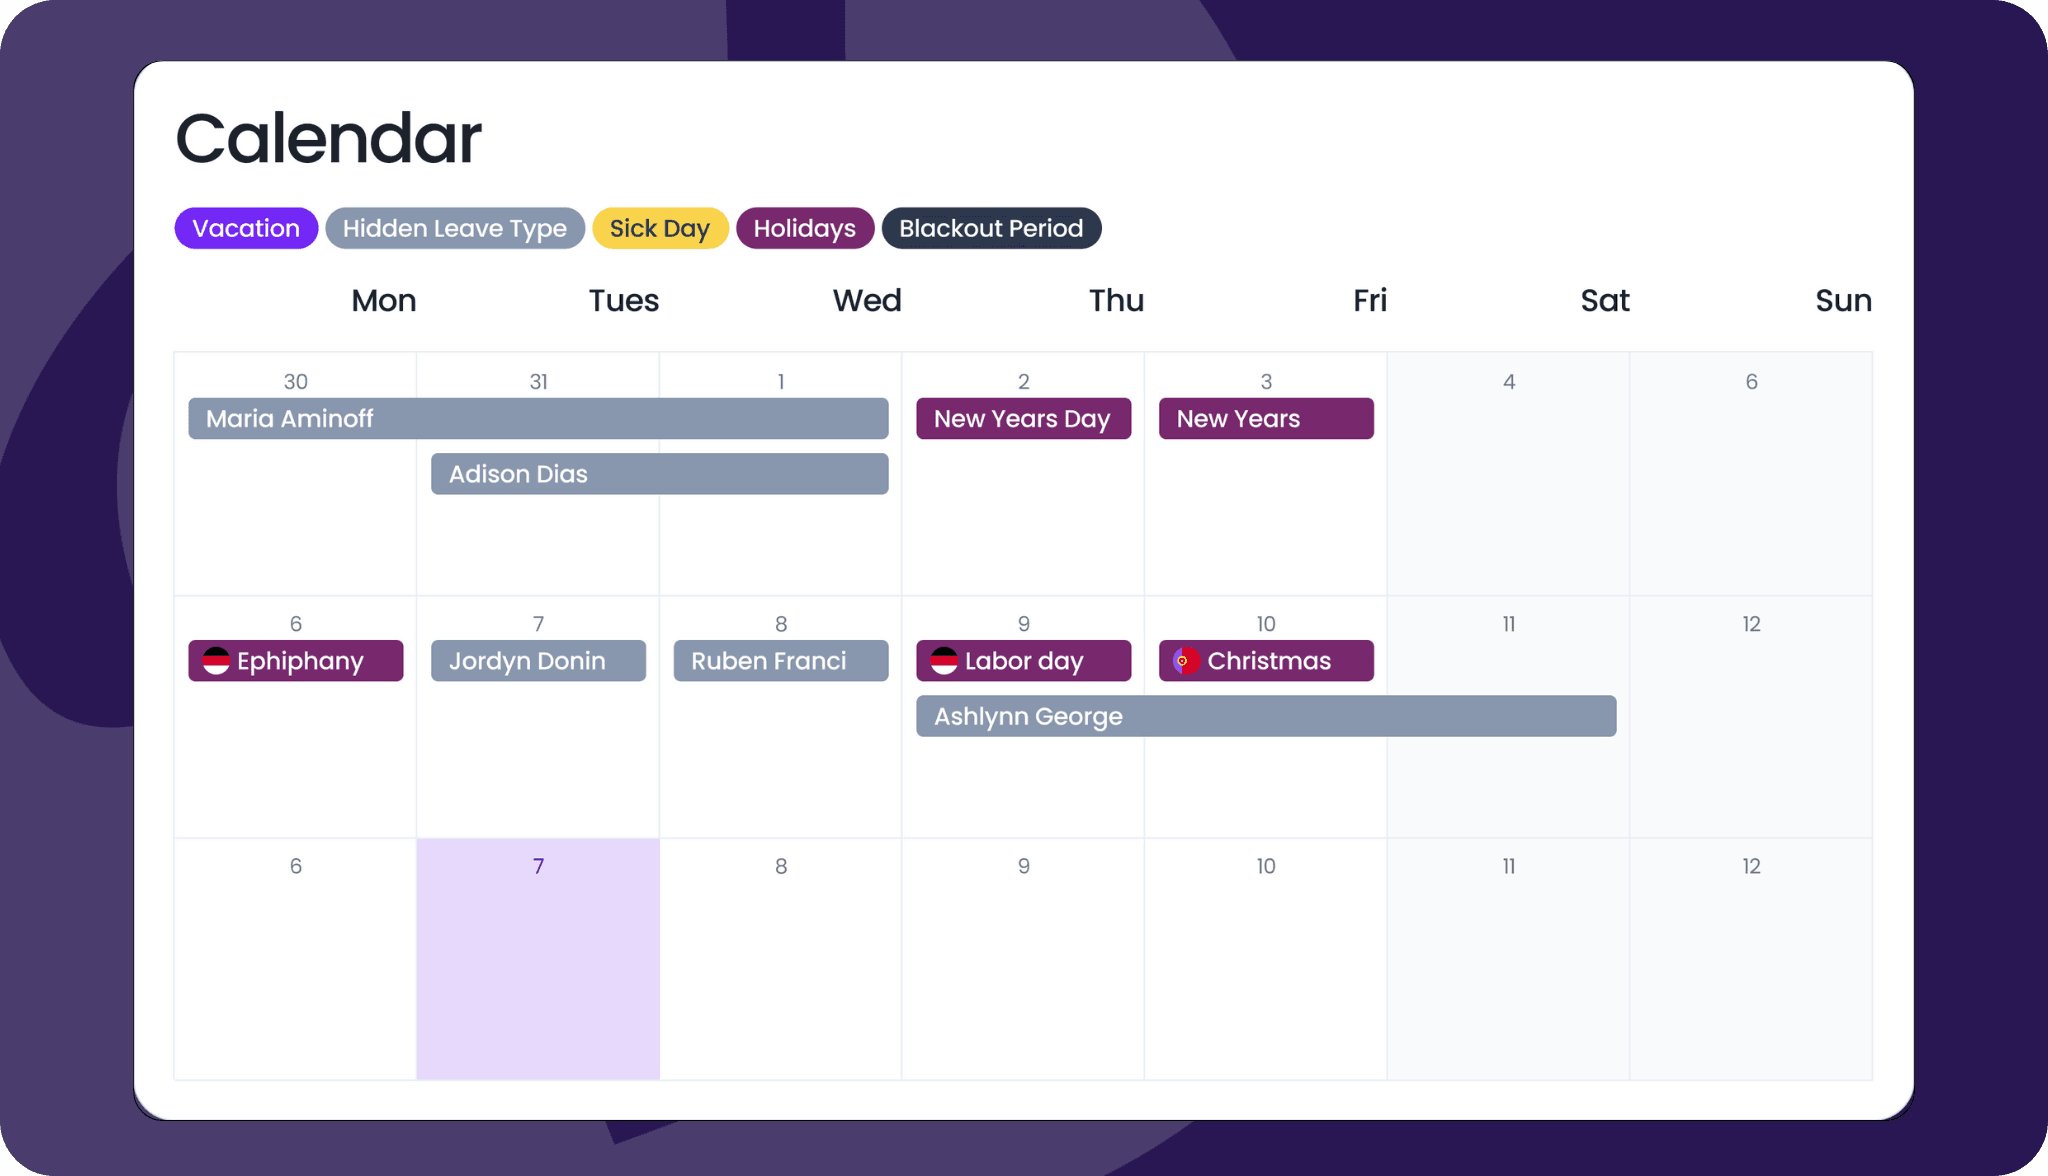
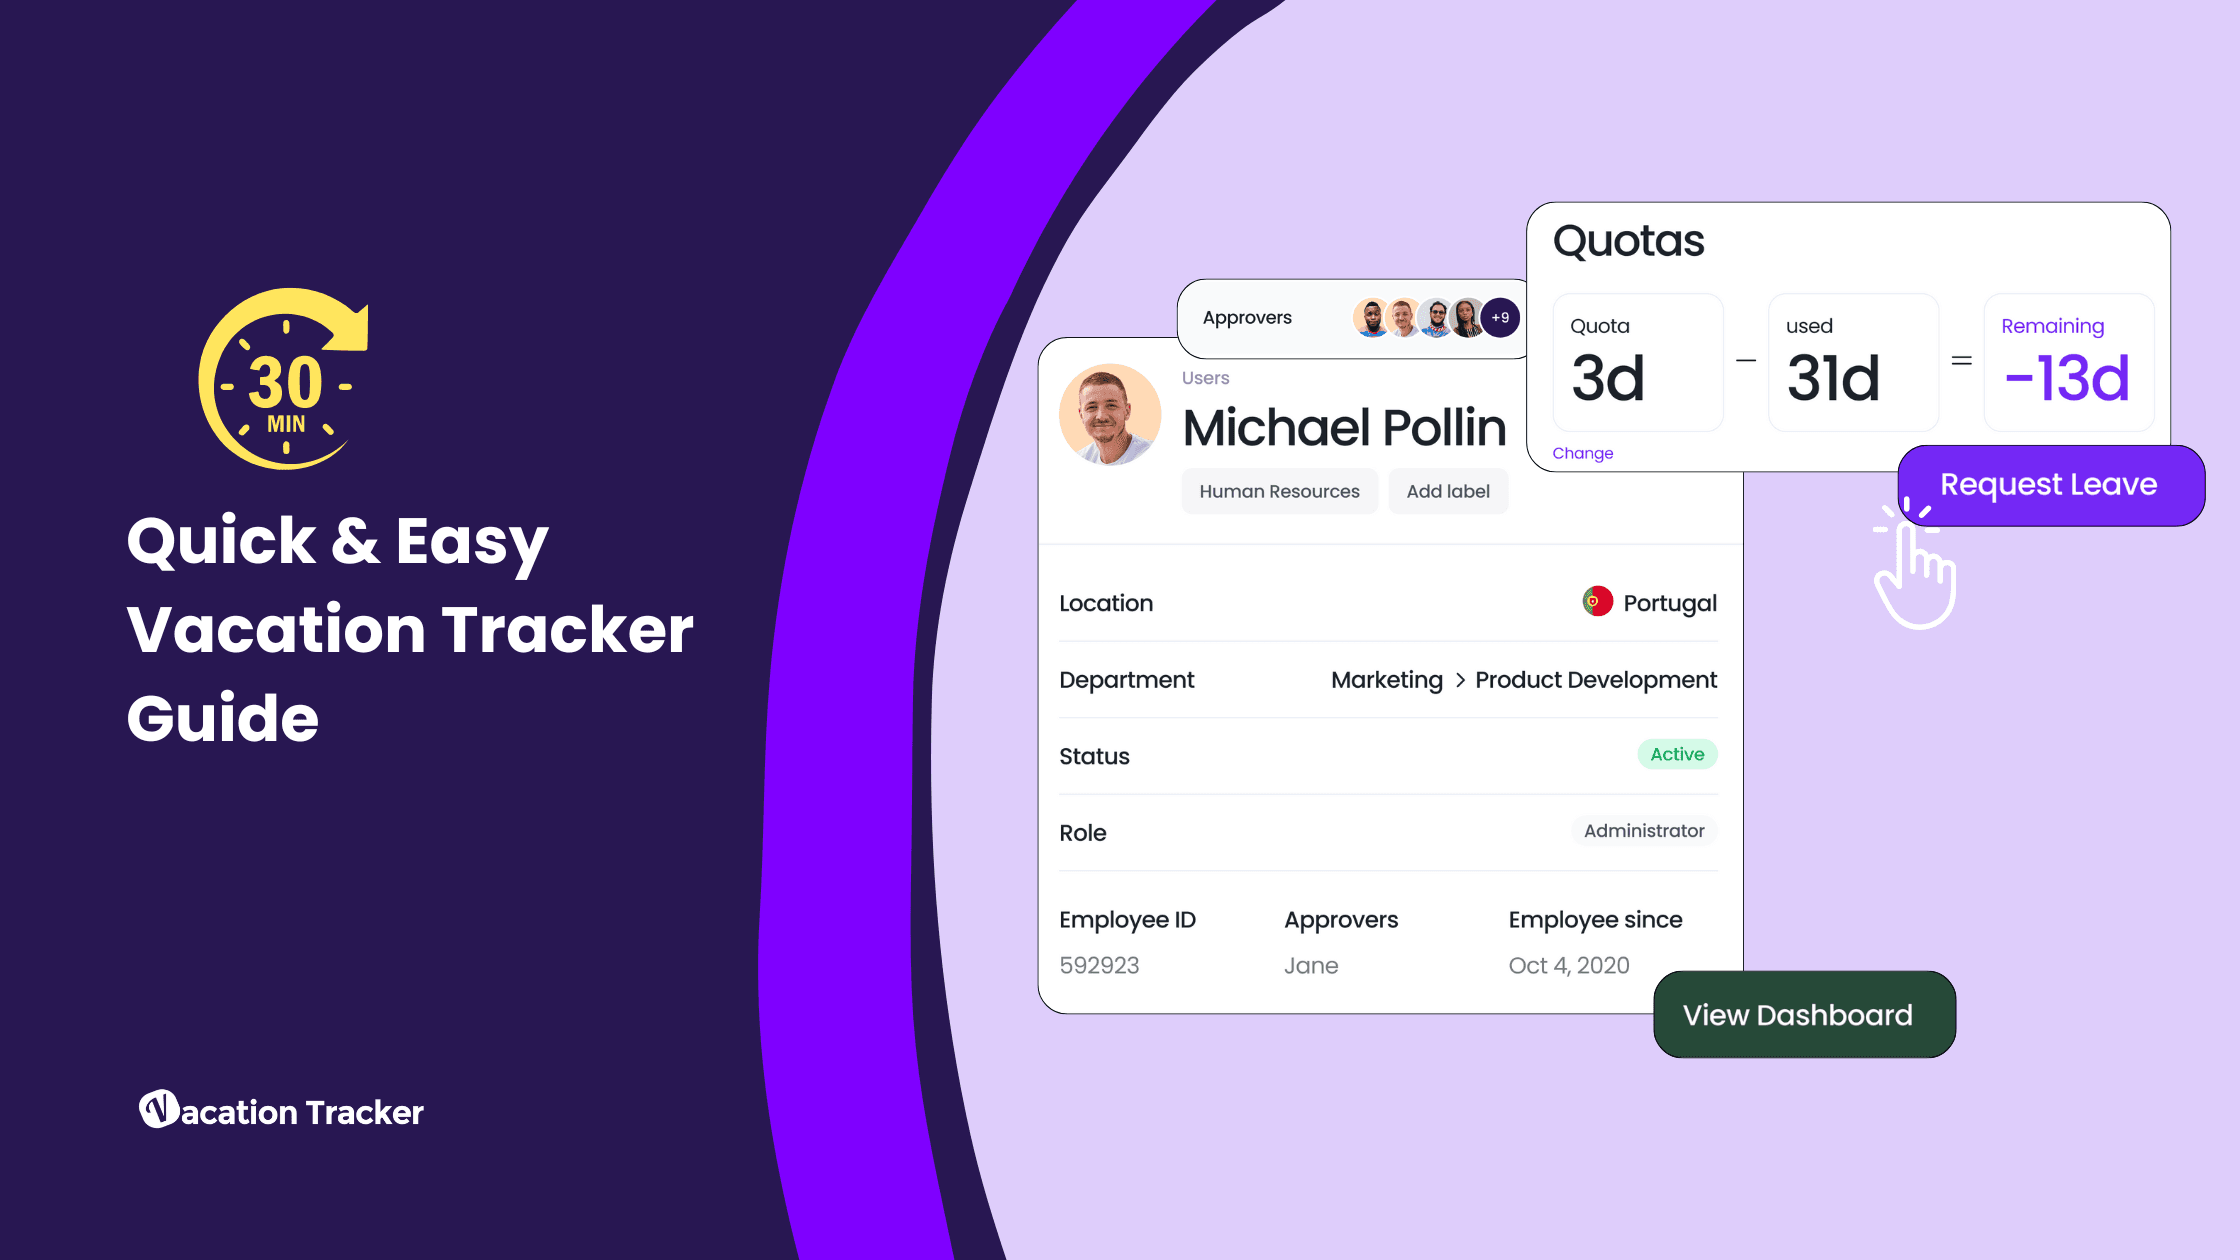
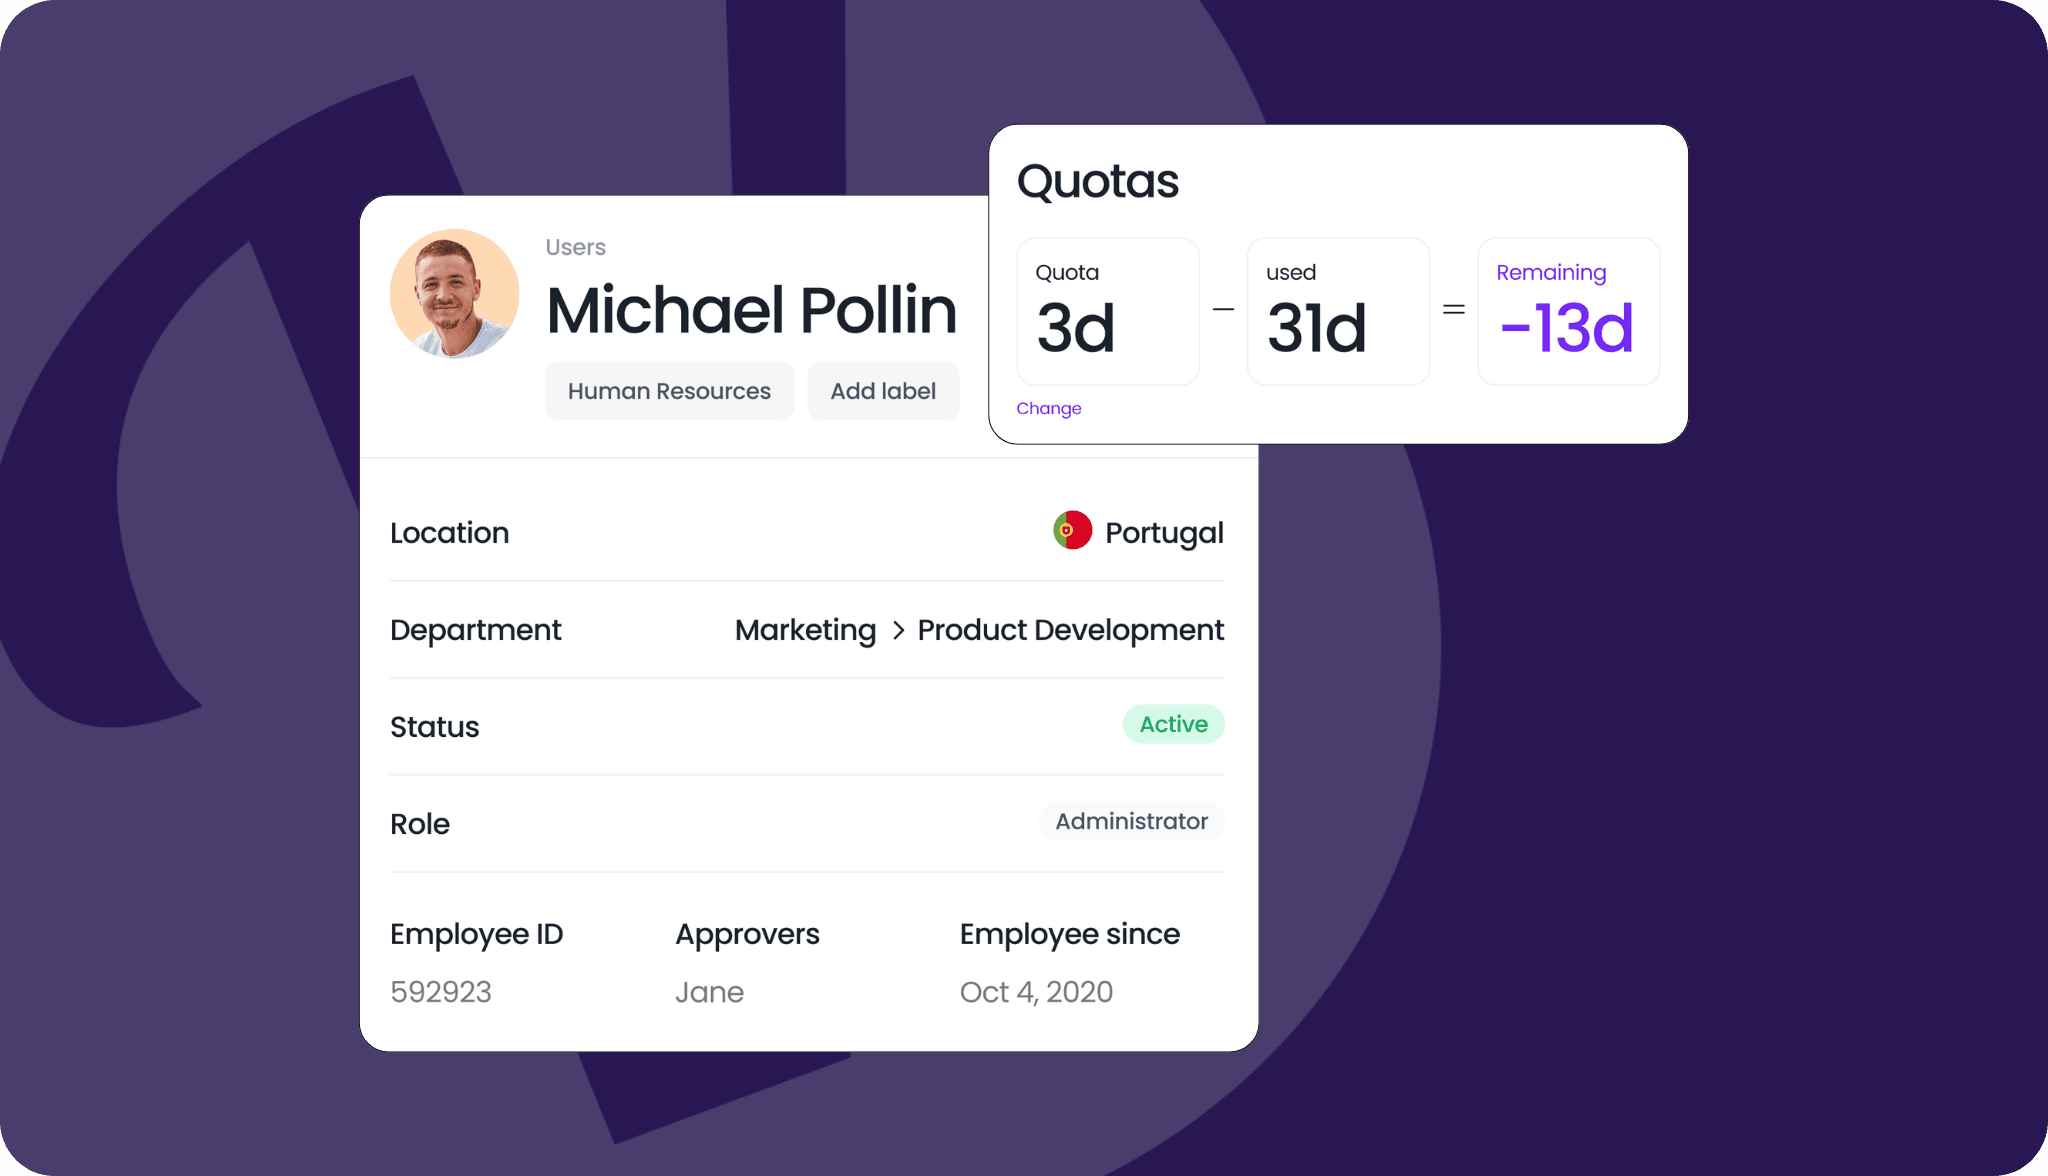
User Profiles
Each user has their own profile with details like leave history, upcoming time off, assigned location and department, and current quotas. Admins can view other users’ profiles, but users can only see their own. Approvers have restricted visibility, they can only view profiles of users within the departments they’re assigned to approve.
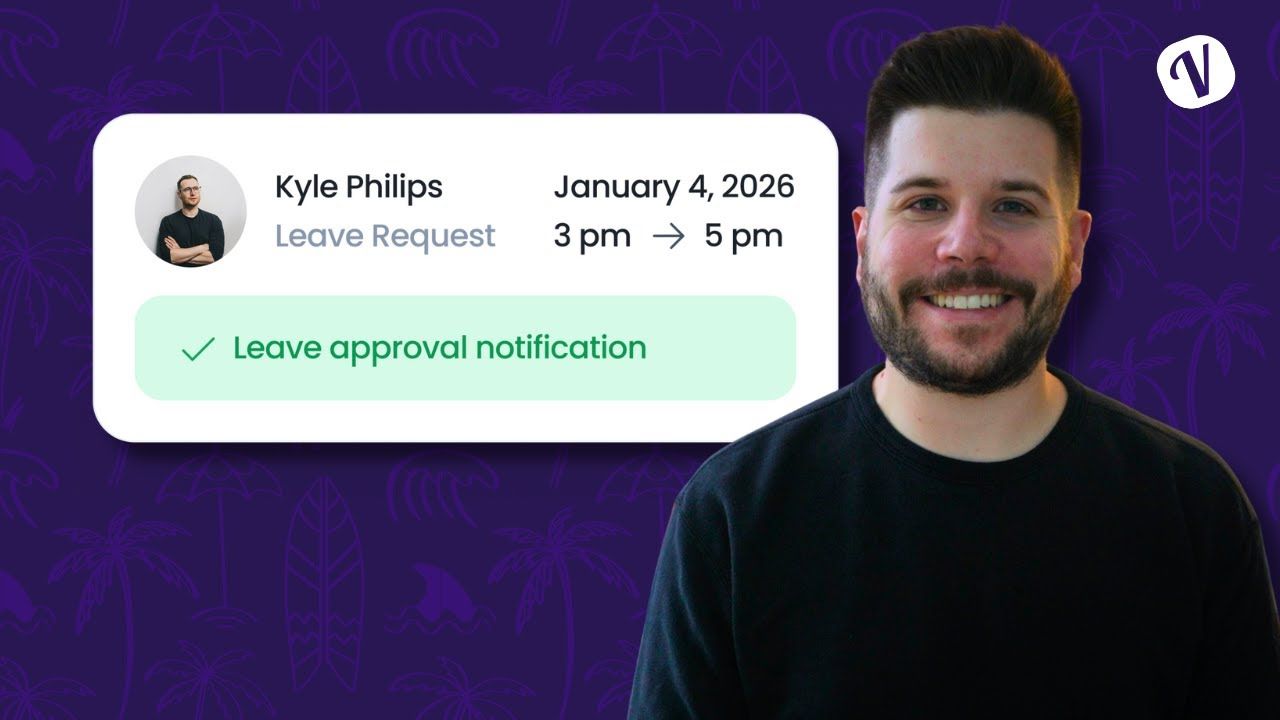
How To Request & Approve Leave
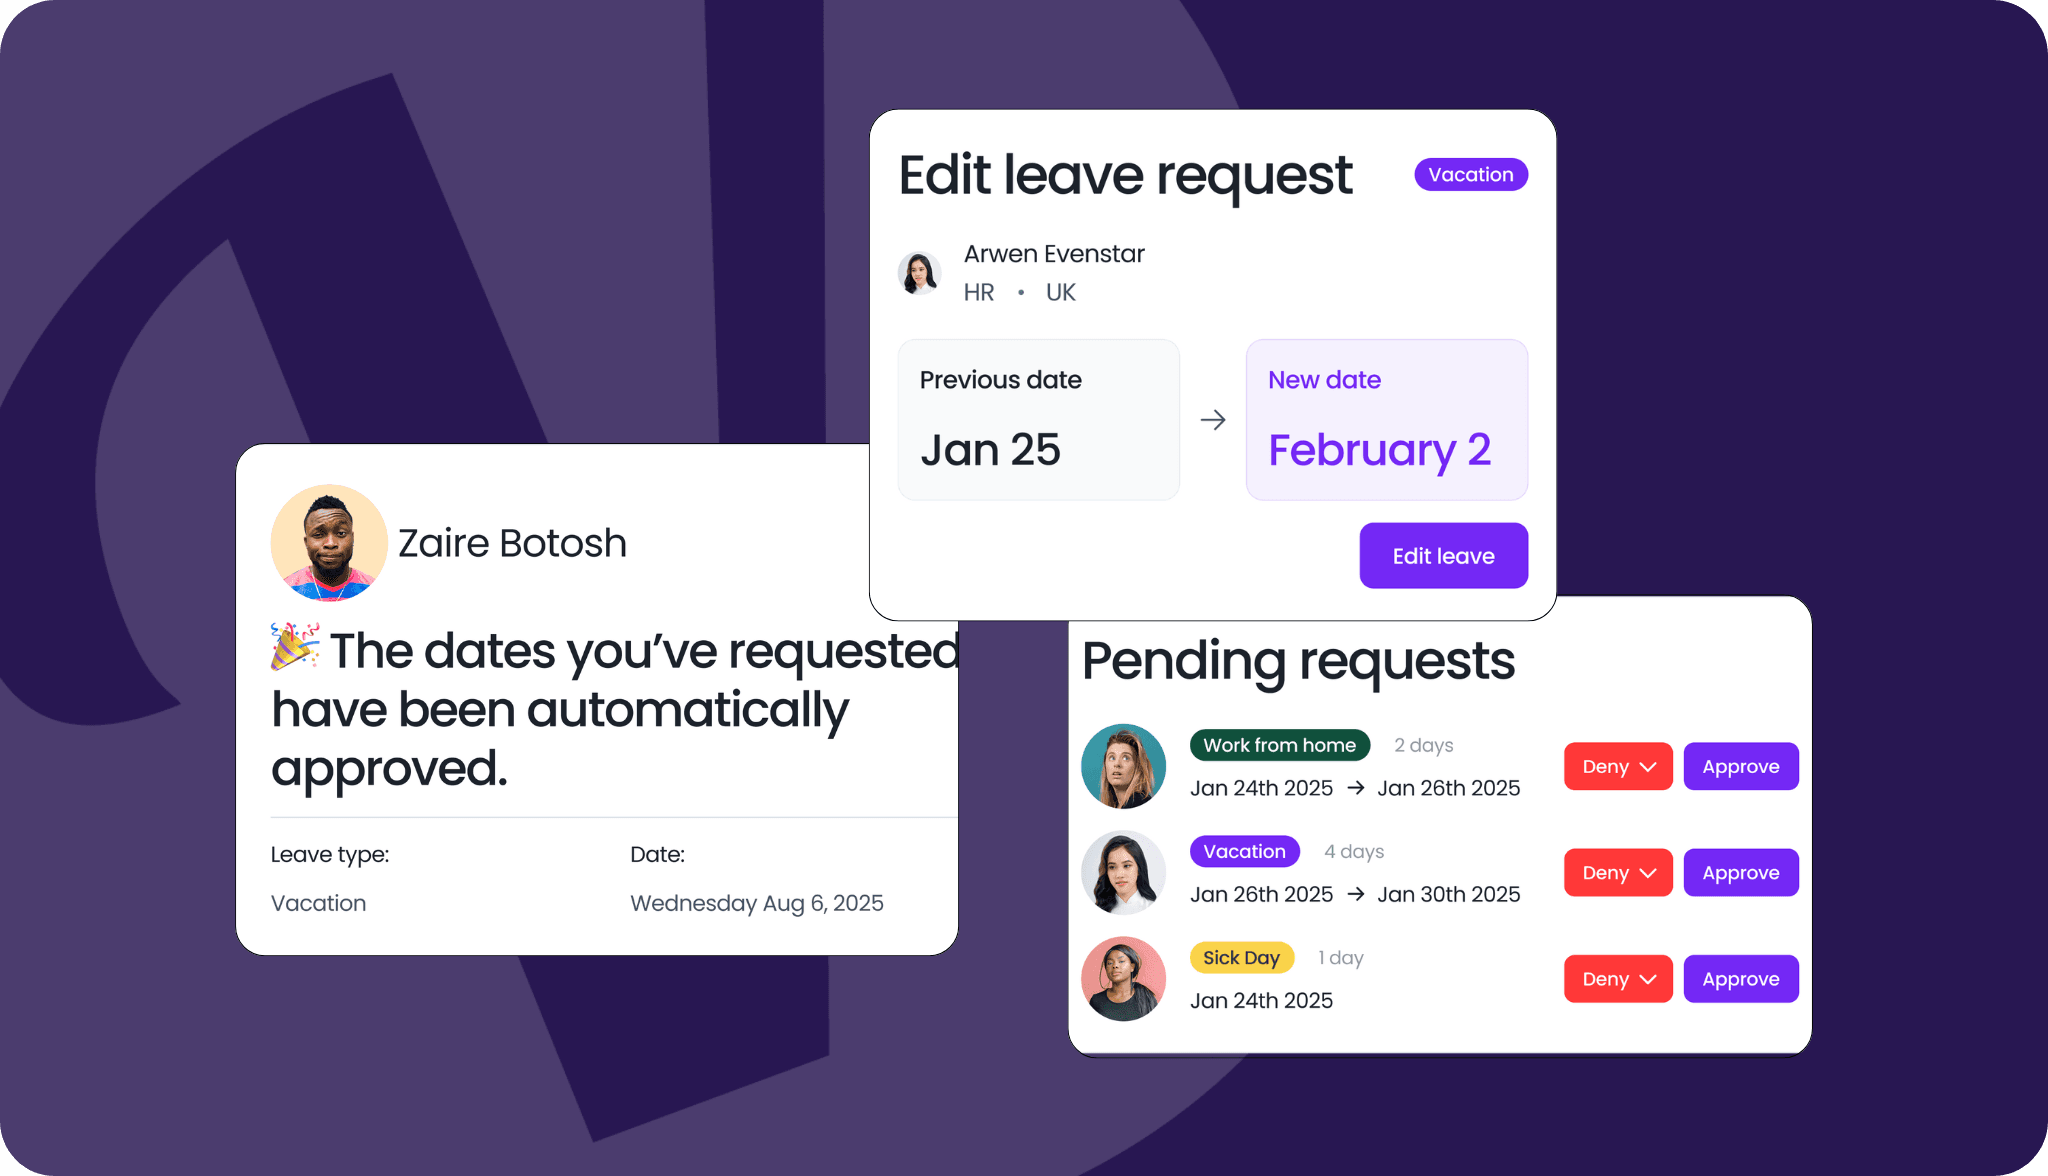
So, you’ve set everything up and had a look around the platform, now there’s only one thing left to do: Start tracking PTO!
Submitting your first leave request is simple. Users can submit a leave request in just a few clicks, either directly from the Vacation Tracker dashboard or within Slack or Microsoft Teams, depending on your integration. Users are also able to view the status of their requests and edit or cancel them if plans change.
Each request includes the leave type, dates, and reason. Once submitted, the assigned Approver will be notified and can approve or deny the request right from their dashboard or integration.
Easy as that! You’ve officially automated your PTO process.
Resource: How Do I Request a Leave?
You’re Set Up (for Success)!
Congratulations! Your setup is complete, you know your way around the software, and you’re ready to start managing time off with total confidence. Whether you’re approving requests, checking team availability, or exporting reports, everything you need is just a few clicks away.
And if you ever need help, remember that we’re always here, through our Helpdesk articles, live chat, or email.
Are you still exploring your options? Book a free demo and we’ll walk you through the platform, answer your questions, and help you decide if Vacation Tracker is the right fit.
Tracking Can Be
Learn how to manage time off without
confusion, delays, or admin headaches.

Claudia
Claudia is an experienced marketer with a passion for writing and creating engaging content that connects with readers.