





Last updated on September 14, 2026
How Do I Deactivate a User?
Some employees need to step away for a while — extended leave, a sabbatical, a long contract gap — and you don't want them counted in your seat total or receiving Vacation Tracker pings while they're out. Deactivating moves them to the Inactive list: they can't access the system, you stop being billed for them, but everything (history, balances, settings) stays preserved for when they come back.
Deactivate a User
- Sign in at app.vacationtracker.io.
- In the left-hand menu, under Team & Approval Flows, click Users.
- Find the user. Use the Search users field above the table if your team is large.
- Hover over their row and click the three-dot menu (…) at the right end of it.
- Click Deactivate. A confirmation box appears, headed Change status for [user name], telling you the user will lose access to Vacation Tracker and stop counting as a billed seat, and that their leave history stays. Click Deactivate to confirm.
The user drops out of the list straight away. They have not gone anywhere: set the Status filter above the table to Inactive to see them again.
Deactivate Several People at Once
- On the Users page, tick the checkbox at the left of each row you want to deactivate. Narrowing the list first with the Locations, Departments or Labels filters makes this quicker.
- A bar appears at the bottom of the page showing how many users you have selected.
- Click Deactivate in that bar, then confirm in the box that appears. Its button is labelled with the number of people you picked, for example Deactivate 3 users.
Clear selection in the same bar unticks everything if you picked the wrong people.
From the User’s Profile
If you are already on someone’s profile, you can do it from there instead:
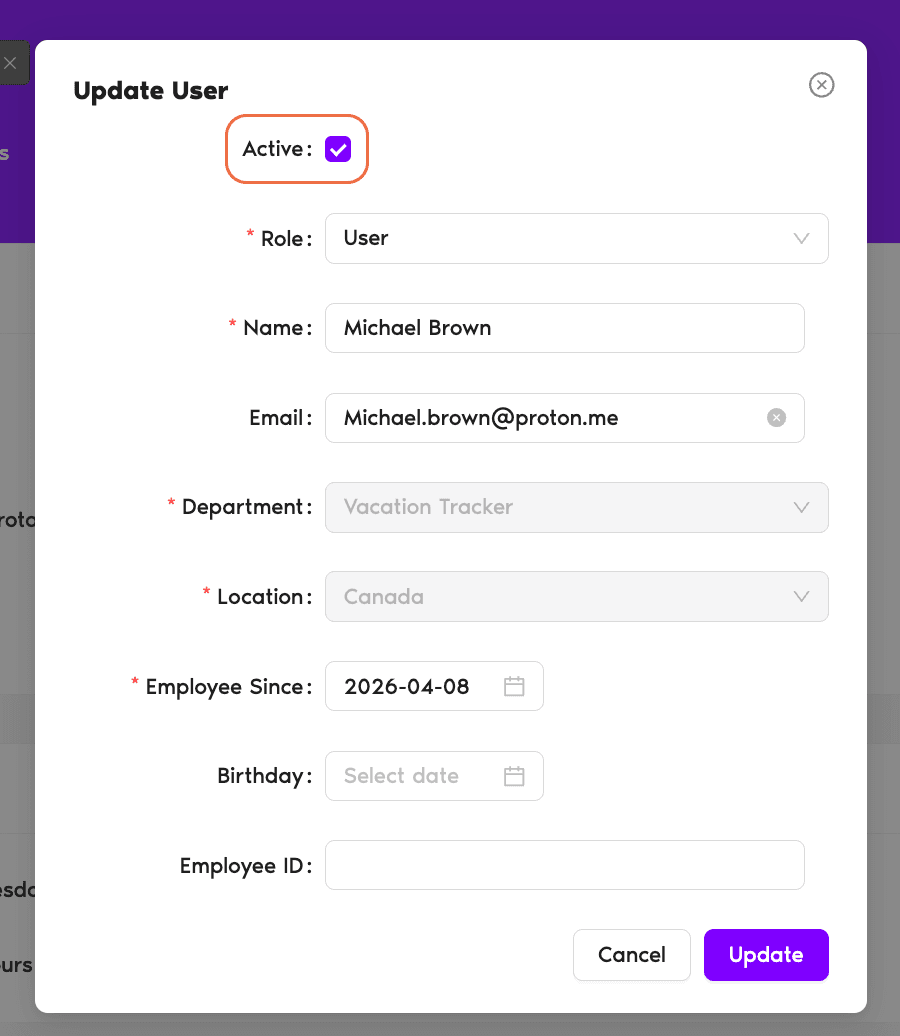
- In the User Profile box, click Edit in the upper-right corner. The Update User modal opens.
- At the top of the modal, uncheck the Active checkbox.
- Click Update at the bottom of the modal.
That same modal opens straight from the list if you pick Edit user details in the three-dot menu on a user’s row, so you do not have to open the profile first.
Reactivating a User
Same flow, in reverse. Open the Users page and set the Status filter to Inactive. From there, either click Activate in the three-dot menu on their row, or open Edit user details, tick the Active checkbox back on and click Update. Selecting several people at once gives you Activate in the bottom bar as well. They come back with all their settings, leave history, and balances exactly as they were.
What Changes — and What Doesn't
What changes
The user can no longer sign in, submit leave requests, or be approved for new leaves. They stop receiving any Vacation Tracker notifications, and they're not counted toward your billing seat total — so deactivating saves money on your subscription.
What doesn't change
Their leave history, balances, Brought Forward amounts, working days, Department/Location assignment, and every other piece of profile data stay exactly where they were. Admins can still open the user's profile and edit fields if needed, even while the user is on the Inactive list.
Common Questions
Yes — Inactive users don't count toward your seat total and your organization isn't billed for them. The same applies to Deleted users. Only Active users factor into your subscription pricing.
Deactivating is something you do manually — uncheck Active, click Update. Deletion happens automatically when someone is removed from your Slack/Microsoft Teams/Google Workspace directory. Inactive users can be reactivated by an Admin from inside Vacation Tracker; Deleted users can only return if they're re-added to the source integration first. See What is the Difference Between Inactive and Deleted Users?
Pending requests aren't auto-cancelled when you deactivate a user. Approvers can still act on them as normal. The user just can't submit any new requests until they're reactivated.
 Book a Call