Last updated on January 20, 2026
How Can I Create and Configure Leave Types?
A Leave Type is a category of time off — Vacation, Sick Day, Working from Home, Bereavement, Maternity, and so on. The Leave Type holds the basic identity (name, color, calendar status); the rules around it — quota, approval, accruals, rollover — live on Leave Policies, which tie a Leave Type to a Location.
Step 1: Create the Leave Type
- Sign in at app.vacationtracker.io with an Admin account.
- In the left-hand menu, expand Leave Setup and click Leave Types.
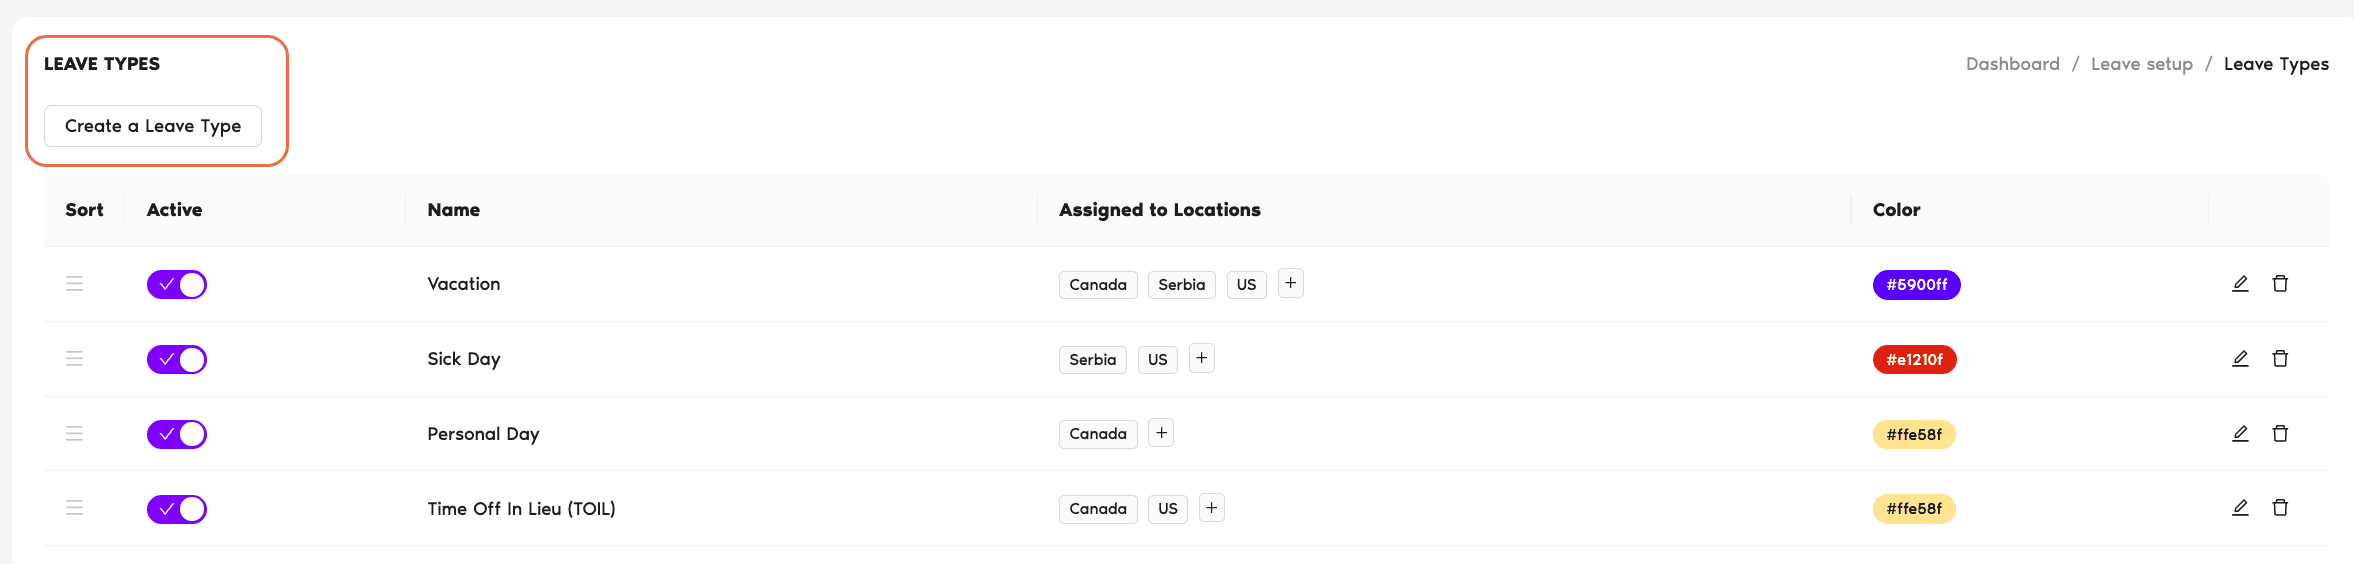
- Click the Create a Leave Type button at the top-left of the Leave Types table.
The Create Leave Type & Assign Leave Policy wizard opens. Step 1 (Create Leave Type) has these fields:
Name
What the Leave Type is called everywhere in the app — request forms, calendar, reports, notifications. Pick something employees will instantly recognize (Vacation, Sick Day, Personal Day).
Color
The colour used to display this Leave Type on the Calendar and Wallchart so it's visually distinguishable from other types. Click the colour box to pick.
Show this leave type in your calendar as
A dropdown with two options that controls how the leave appears on connected personal calendars (Google Calendar, Outlook, iCal):
Set Slack Status
A toggle that's only meaningful if your account is connected to Slack. Turn it on and a follow-up field appears that maps this Leave Type to a Slack status emoji + text (e.g. "🌴 On Vacation"). When approved leave starts, Vacation Tracker will set the User's Slack status automatically; when it ends, it clears it.
- Click Next to move to the Leave Policy setup.
Step 2: Assign to Locations and Set the Initial Policy
This is where you tie the new Leave Type to one or more Locations and configure the starter rules. The header reads "Assign [Leave Type Name] to all locations or a specific location."
Locations
Required. A multi-select that lists every Location on your account; all are pre-selected. Remove any where you don't want this Leave Type to apply. The same rules you configure below will be used as the starter policy on each Location you keep — you can fine-tune per-Location later from Leave Setup → Locations → Edit Leave Policies.
Leave Policy fields
Checkbox, on by default. When on, requests need an Approver to approve them before they're counted against the balance. When off, requests are auto-approved the moment they're submitted.
Lets a User submit a request even after they've used up their full quota — useful when you want to support borrowing against future leave. Combined with Negative Brought Forward (on the rollover settings), the deficit can carry into the next year.
Removes the cap on this Leave Type — turn it on for things like Working from Home where there's no fixed annual count. When this is on, the Yearly Leave Quota field is hidden because there's no number to set. Approval rules still apply.
Required (unless Unlimited Quota is on). The base annual entitlement every User gets. The unit (Days or Hours) follows the workspace-wide Set Leave Quotas in setting under Workspace Settings → General → Configuration — "Days" is the default. Individual Users can be adjusted later under Customize Leave Quotas.
Dropdown that sets the minimum unit a User can request. Full Day (default) on every plan, Half day on Core and Complete, plus 1 hour / 30 minutes / 15 minutes on the Complete plan. See How Do I Set Half-Day Intervals? for the half-day flow.
When on, the request form makes the Reason field mandatory — Users can't submit without writing one. Useful when context matters for approval. See How Do I Make Adding a Reason Mandatory?
When on, Users can submit requests for dates that have already passed (and edit existing ones). Past-dated requests always go through approval regardless of the Approval Required setting — that's a deliberate guardrail to keep historical data trustworthy. See How Can Users Request a Past Leave?
Hides the Leave Type's name from anyone who isn't an Admin, an Approver, or the requester themselves — teammates see "unavailable" instead of "Sick Day" or "Mental Health Day". Privacy-friendly default for sensitive types. See How Do I Hide a Requested Leave Type Name?
Accruals, Brought Forward, and TOIL
The wizard's Accruals and Time Off In Lieu sections are visible but inactive at this step — both fields are greyed out, and Vacation Tracker prints helper text saying so:
The Brought Forward Settings section is active here — pick Disabled, Limited, or All. (You can change this later per Location.) See How Do I Set a Brought Forward (Rollover) Policy?
- Click Create And Assign. The new Leave Type appears in the Leave Types table with the Locations you picked, and the starter policies are now editable per Location.
Editing or Deleting a Leave Type Later
Each row in the Leave Types table has icons on the right:
To rearrange the order Users see Leave Types in on the request form, use the Sort handle on the left of each row — drag to reorder. See How Do I Sort the Order of Leave Types?
Common Questions
There's no fixed cap — create as many as your team needs. Most workspaces stay between 4 and 10. Heavy fragmentation (a separate type for every situation) tends to clutter the request form and dilute reporting; reusing a single Leave Type across Locations and Departments is easier to maintain.
No — that's the opposite of how Vacation Tracker is designed. Create one Leave Type (e.g. "Vacation"), then assign it to multiple Locations and configure the per-Location rules separately on each Location's Leave Policies tab. The wizard's "Similar Leave Type" warning exists for exactly this reason.
By design — Accruals and TOIL are configured per Leave Policy (per Location), not at the Leave Type level. The wizard's helper text says so directly. After you click Create And Assign, open Leave Setup → Locations → Edit Leave Policies on each Location and edit this Leave Type's policy to set Accrual schedule, Allow Negative Balance, TOIL options, and other Location-specific rules. See How Do I Set Up and Configure Accruals? and How Do I Enable and Configure TOIL?
Flipping the Active toggle off hides the Leave Type from the request form going forward — Users can no longer submit new requests for it. Already-approved or pending leaves on that type stay in the data and continue to appear in calendars, reports, and User profiles. Deactivating is reversible; deleting (trash icon) is not.
It's about how connected personal calendars (Google Calendar, Outlook, etc.) treat the leave when Vacation Tracker syncs it across. Busy blocks meeting scheduling — colleagues using calendar tools will see the User as unavailable. Free doesn't block — useful for things like Working from Home where the User is online and reachable, just not in the office. The setting only affects the calendar sync; in-app behavior (request, balance, approval) is identical either way.
Yes, in two places. The Edit pencil on the Leave Types row covers the type's identity (Name, Color, Active, calendar status, Slack Status). For policy rules — quota, approval, accruals, rollover, TOIL, half-day, and the rest — go to Leave Setup → Locations → Edit Leave Policies on the relevant Location and click the pencil next to this Leave Type's row. See How Do I Create and Configure Leave Policies? for the policy-side fields.